Shakespeare Automatic

You got 'em, we know how to clean 'em
Post Reply
hrbarrows
Big ORCA Fan
Posts: 1
Joined: Sun Jan 09, 2011 6:09 pm

Shakespeare Automatic

Post by hrbarrows »

Does anyone have any info on the Shakespeare OK Automatic 1825 model EK. I am in need of the schematics and any tips on taking it apart. I am a little nervous about the spring mechanism. Anything would be great :D

Thanks,
Heath
User avatar
Rick H
Ultra Board Poster
Posts: 1562
Joined: Wed Oct 29, 2008 9:23 pm
Location: Hilliard, Fl.
Contact:

Post by Rick H »

Use the Search option at the top, enter the name Don Woodhouse into the 2nd box down (search for author). When you find one of his entries, click on his name and that take ya to his Profile. You can PM (Private Message him from there. I don't have an 1825 EK or I'd send ya a copy of the schematics. BUT...Don will have something.

I'll send ya what I have...when I get home (currently at work).

You're smart to be nervous about tearing it apart. The last guy who did, without the knowledge, resided in So. California. His head, made the winning basket in N.Y. during the 2008 Playoffs! TWANNNNG! :wink:
User avatar
Rick H
Ultra Board Poster
Posts: 1562
Joined: Wed Oct 29, 2008 9:23 pm
Location: Hilliard, Fl.
Contact:

Post by Rick H »

Heath...eMail enroute with...Specs, Pics and Directions.
Stick to the directions and TAKE YOUR TIME. You'll be fine.

Oh ya and the EK designates the start of production was 1961.
User avatar
Charged
Advanced Board Poster
Posts: 107
Joined: Thu Oct 21, 2010 8:36 pm

Post by Charged »

hrbarrows, Here is a portion of a post I made on another board, It will give you an idea how to tackle the springs installation. This here is not the same reel, but I'm assuming the re-installation of the spring will be similar.

I'm hoping this might help you.


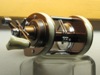
"Anyone who has taken apart one of these reels, has probably seen a image that looks something like this.

Image

It's really not all that hard to get it back together again, here is how its done.

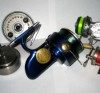
Start out by pushing the spring back into the housing, starting at the outside perimeter of the housing. The first loop of the spring will be by far the most difficult one.

Image

Once you get the first "Spring" loop in, the rest of the springs packing is a cake walk, the hard part is already over. Continue pushing the spring in slowly around the outside perimeter, working your way towards the center.

Image

After about 30 seconds of working your way around the springs perimeter, it all fits back into the housing fairly easily.

Image "
Last edited by Charged on Thu Jan 27, 2011 8:18 pm, edited 1 time in total.
Post Reply