New cap and click for an Orvis 1874 patent reel

You got 'em, we know how to clean 'em
Post Reply
User avatar
EclecticGuy
Advanced Board Poster
Posts: 115
Joined: Wed Jan 28, 2009 7:50 am
Location: Groton, MA
Contact:

New cap and click for an Orvis 1874 patent reel

Post by EclecticGuy »

Some of you may have seen my post from a few weeks ago asking for info on the click mechanism on the Orvis 1874 patent reel. I didn't find any information but as I was scrutinizing one of my reels, I noticed that the cap was designed to come off! The tab opposite the click pivot is "Z" shaped and can be be snapped out (at least on my 2 reels). Here is a photo of the inner workings of the reel:

Image

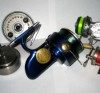
You can see the tiny steel pawl and spring. The spring is soldered to the cap. The little hole in the tab by the pawl might have been for the nickel plating process. There is no obvious reason for it to be there. After scrutinizing my reel, I fabricated a replacement for my friend's 1874 patent bass reel (the wide spool version of the reel). It is made of brass, nickel plated, and a steel pawl.

Image

You can see the soldered spring and shape of the tabs a little better in this photo. I "wore" the edges of the cap with 1500 grit to mimic the other caps I have seen. Here is the result on the reel:

Image

I need to cut the shine a bit and highlight the exposed brass by treatment in fuming vinegar. That will darken the brass and nickel to match the original.

Unfortunately, at this stage I was mucking around with the cap and mangled it a bit. I need to remake the cap but I can reuse the spring and pawl. Note to self "if it isn't broke, don't fix it."

cheers,
Michael
User avatar
EclecticGuy
Advanced Board Poster
Posts: 115
Joined: Wed Jan 28, 2009 7:50 am
Location: Groton, MA
Contact:

How I made it...

Post by EclecticGuy »

Well, since I have to make another one I thought it would be helpful to folks to show how I did it. Firstly, since I knew I was only making 1 of these (well, ok, 2) I did not invest a lot of effort in making the die and punch. Here it is, steel and aluminum:

Image

It is 3/4" in diameter and about 1/4" deep. I used .020 brass sheet and annealed it by heating to cherry red in a propane torch. This is important so the brass is soft enough to form without tearing. Here is the first part of the forming - not the torn brass, I forgot to anneal this one, doh!

Image

Here's how it looks loaded up:

Image

I used a mallet to drive it in while holding it in a 1 ton arbor press. Simply striking the top of the press ram transmit the force to the plunger. The "right" way to do this would be to construct a die with a radiused top edge, not sharp like mine. But I wanted to try it this way since these dies are quick to make.

Once the part is formed in the die, I trim it with shears. Then I work it with files in the die. I use washers to elevate the part until its wall height is what I want. This way, you can file across the top of the die - which ensures that the edge of the part is flat and even. Here is the part after initial shaping.

Image

And how it looks in the die:

Image

A little more file work and the part is shaped and fits the reel perfectly:

Image

I'll drill the hole for the pawl pivot and nickel plate this part in the next installment.

cheers,
Michael
User avatar
EclecticGuy
Advanced Board Poster
Posts: 115
Joined: Wed Jan 28, 2009 7:50 am
Location: Groton, MA
Contact:

Plating and finishing up

Post by EclecticGuy »

I get a lot of questions on how to nickel plate. For small parts like this cap it is easy and inexpensive. An entire reel frame is a different beast! I use the Caswell Nickel Plug-n-Plate kit. Normally, you brush the part to plate but if you look in the back of the manual, you'll see you can immerse the part and plate. Here's the setup:

Image

It is very important that the part is totally spotless and grease free. I wash it in hot water and Simple Green, then rinse and don't touch it with your hands! The solution is heated in the glass jar in a microwave for 30 seconds to heat it up. That gives the best results. At the other end of the wires is a wall wart transformer. It's that simple. Suspend the part in the solution, plug it in, wait 5-10 minutes and you get this:

Image

Hard to tell but its completely nickel plated. I should mention that I etched my initials and "2011" inside the part before plating to mark it. After rinsing and drying, I peen in the rivet that holds the pawl. Make sure the pawl swings freely. Then I bend the musing wire for the spring using the original as a model.

Image

The spring is soldered to the cap. Nickel solders nicely. The spring is adjusted, the pawl oiled lightly and then the cap installed.

Image

The pawl and rivet are the hardest parts to make.

cheers,
Michael
User avatar
mortepa
Advanced Board Poster
Posts: 243
Joined: Sun Sep 14, 2003 12:15 am
Location: Madison, WI
Contact:

Post by mortepa »

That is really interresting! Thanks for taking the time to share your techniques.
User avatar
EclecticGuy
Advanced Board Poster
Posts: 115
Joined: Wed Jan 28, 2009 7:50 am
Location: Groton, MA
Contact:

Post by EclecticGuy »

Thank you!

cheers,
Michael
User avatar
EclecticGuy
Advanced Board Poster
Posts: 115
Joined: Wed Jan 28, 2009 7:50 am
Location: Groton, MA
Contact:

Post by EclecticGuy »

The cap snaps in place with a nice, firm "snap". Just like the original. I had to adjust the spring to tune the sound so it sounds like the original. Came out pretty nice.

cheers,
Michael
Richard Lodge
Super Board Poster
Posts: 1203
Joined: Tue Sep 16, 2003 10:00 pm
Location: Massachusetts

It's true....

Post by Richard Lodge »

I've seen Michael's work on this in person and it's very, very cool. The cap fits perfectly and the reel looks like it's just waiting for Chas. Orvis himself to come and engrave that cap.
Thanks for sharing the photos and explanation of this was done, Michael!
User avatar
Charged
Advanced Board Poster
Posts: 107
Joined: Thu Oct 21, 2010 8:36 pm

Post by Charged »

Nicely done!
Post Reply