Back in 1992 I decided I wanted to build my own rods. I thought it would be fun & I could save a little money. My first couple of projects were Cabela's Fish Eagle graphite kits. I soon realized that I could upgrade my blanks & guides to make rods that weren't really available to the public, like using Fuji SIC guides, etc. Starting with my third rod I've only built two rods that didn't have SIC guides and that was because I wanted a certain look. I've always preferred Tennessee style cork handles with slip rings. In fact, I've had a couple of high end rods that had standard spinning reel handles and I switched them over to Tennessee slip ring handles. Those were challenging projects, fitting a two piece cork handle to a blank and sliding it on from the rear without them being too loose, but I got it done and they turned out great. It's almost impossible, now, to find new rods with slip ring cork handles unless it's an ultra-lite.
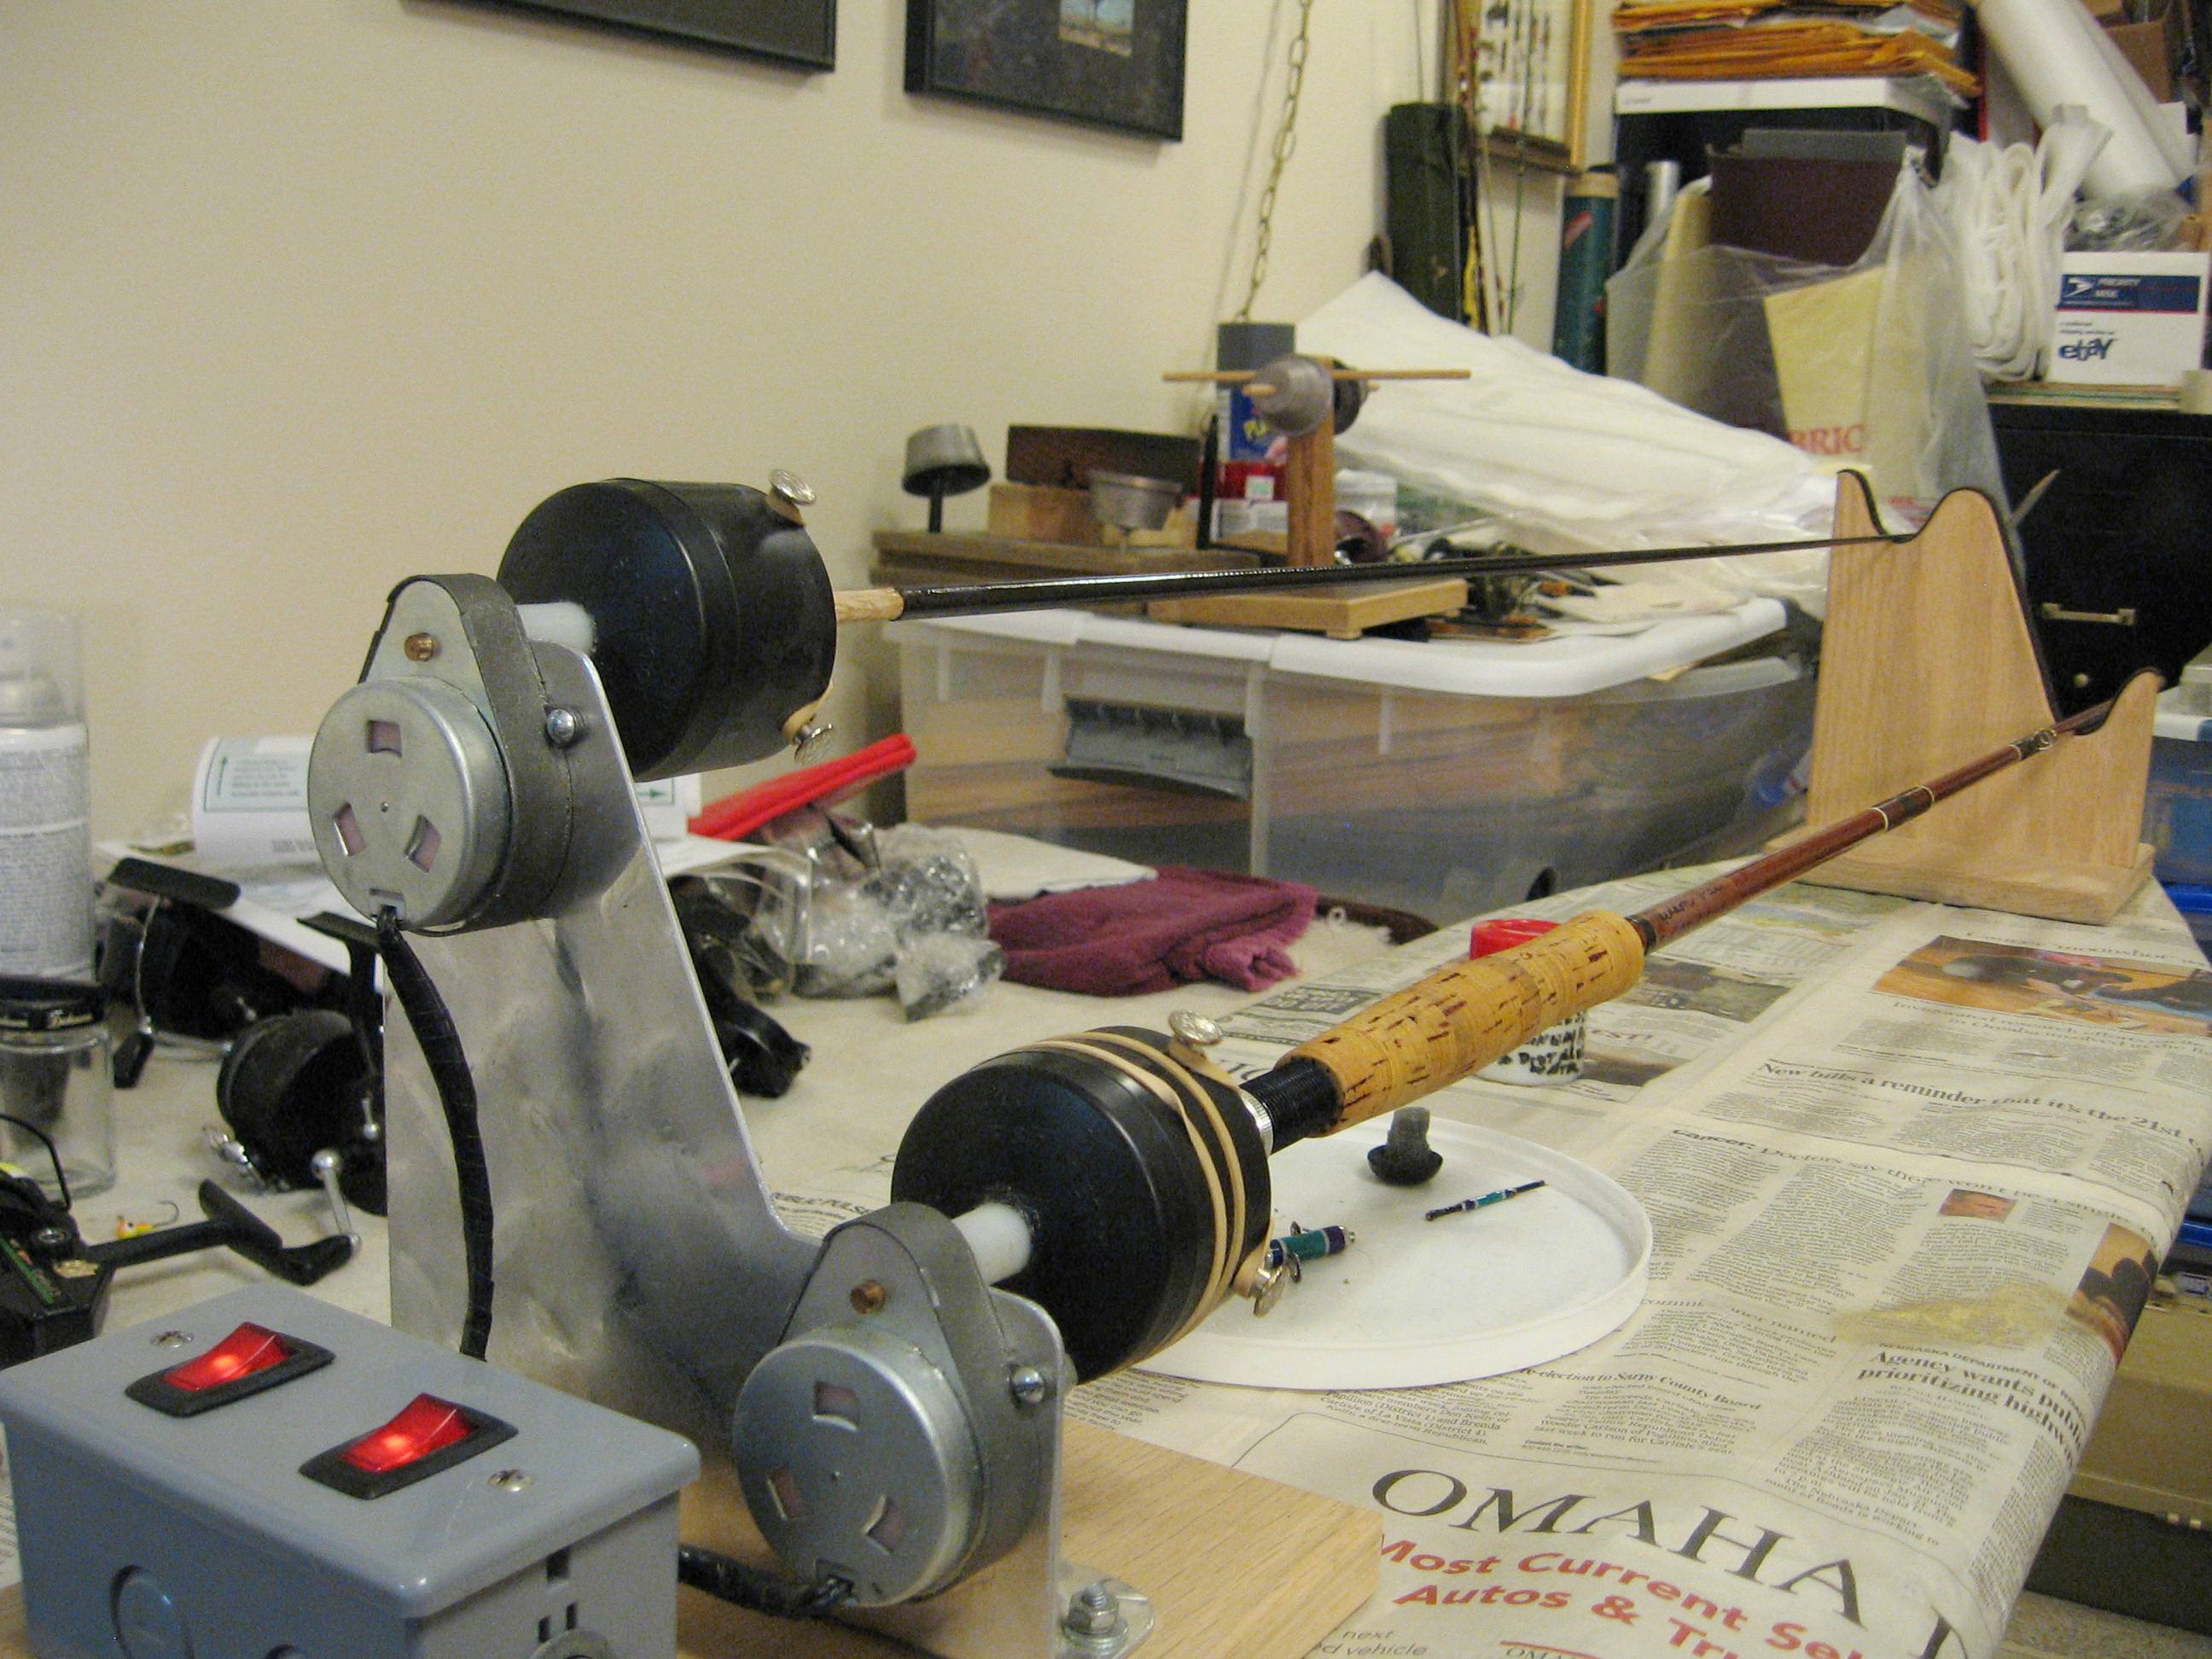
Anyway, when I started I didn't have the funds to purchase high dollar rod building equipment so I built my own. Motorized wrappers for the hobbyist were just starting to come into their own and I couldn't justify the expense. I purchased a slow RPM drying motor from Cabela's and proceeded, using their catalog as a guide, to build my own stuff. Later, I bought a second drying motor so that I could work on two rods at a time.
So, here's the stuff I made starting 28 years ago.
I made the wrapper out of some oak I had laying around. It's kind of heavy, which I like because it doesn't move around when I'm working on a rod. It is expandable in either direction. The 1"x2" base slides into the rabbeted slot for adjust-ability and compact storage. The slot in the wrapper base is sized to a 1/4" flat headed elevator type carriage bolt so that the extension slides easily back and forth.


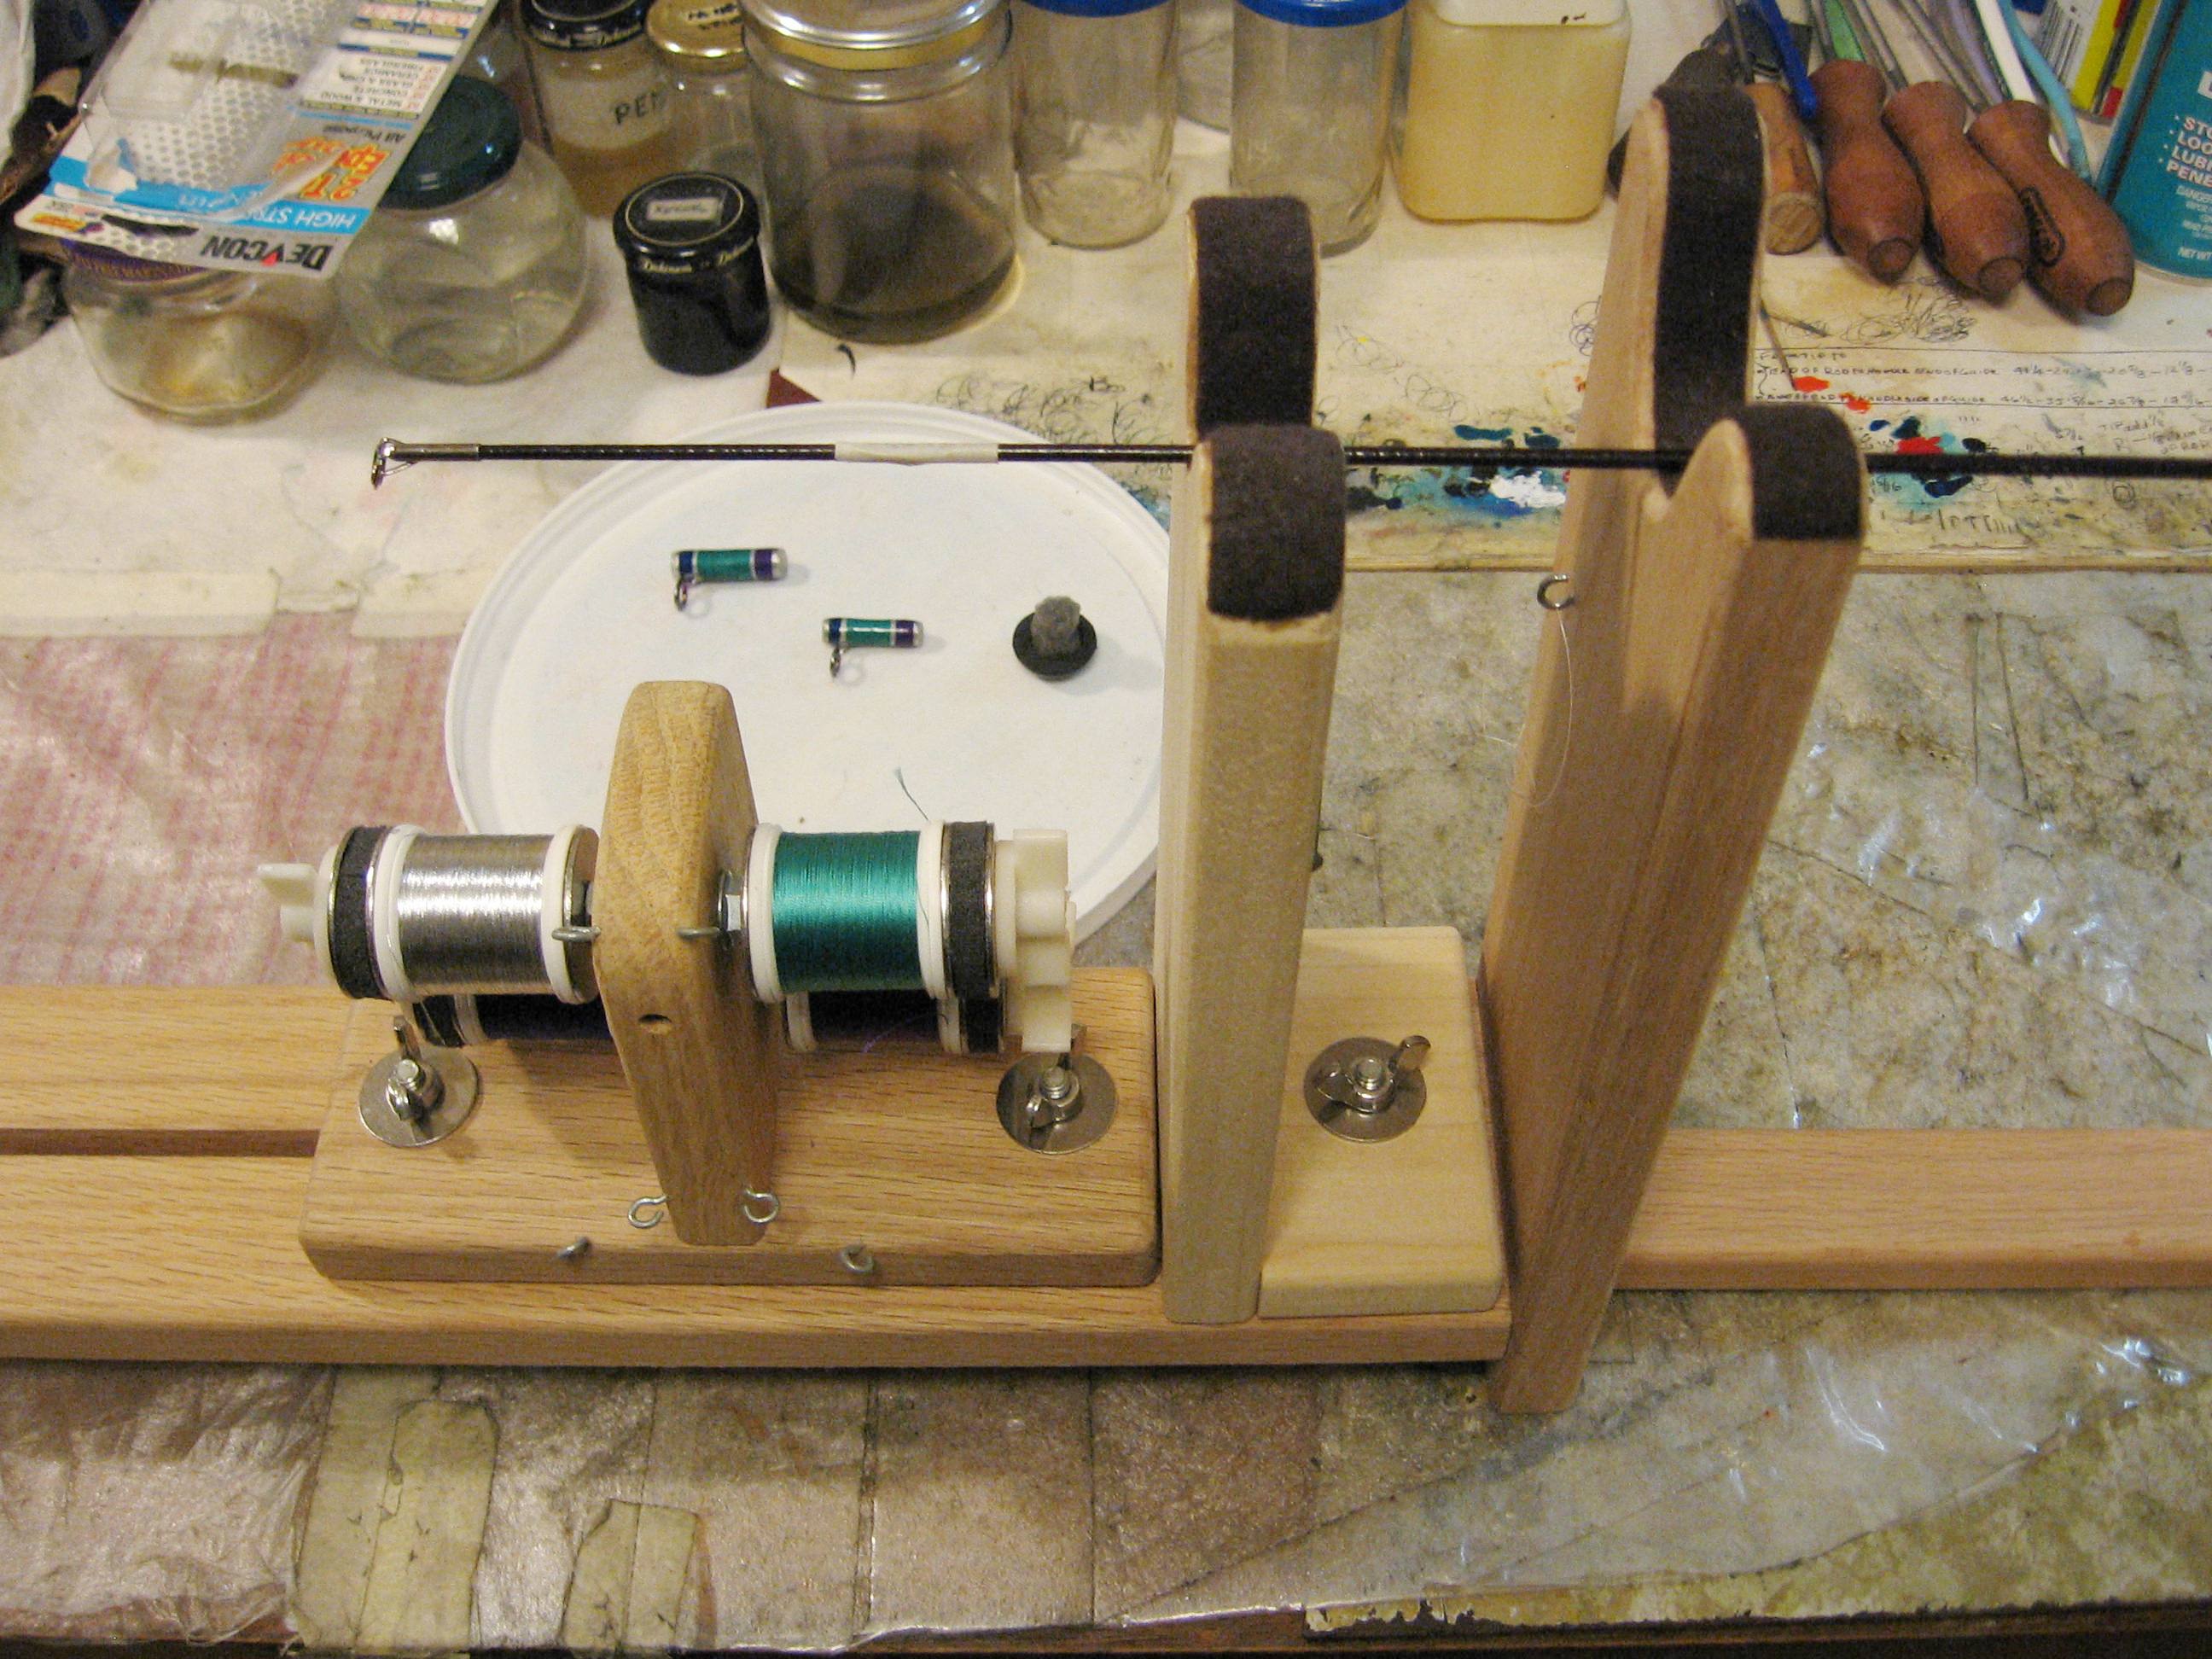
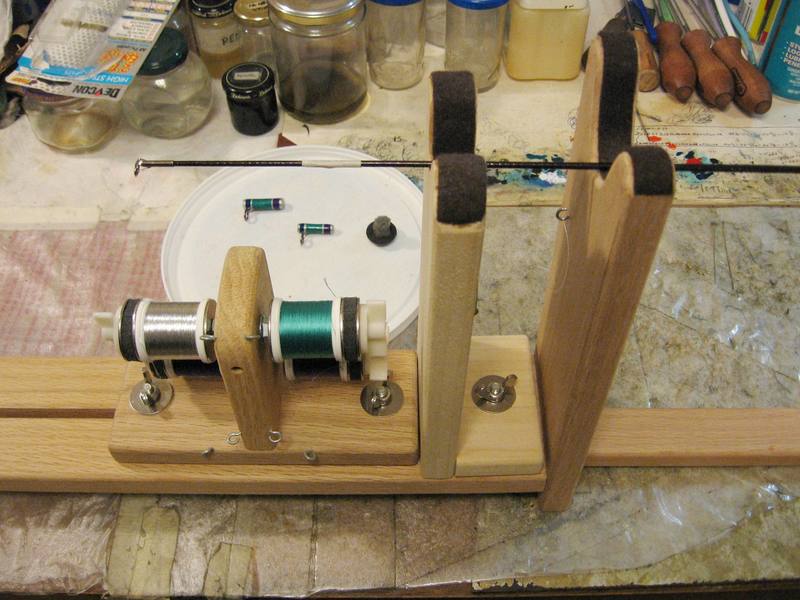
I made it so that I could use four different thread colors at one time. I don't do fancy decorative wrapping so four works great for me. When I made it most hand wrappers were only set up for two different spools. I used 1/4" all-thread to hold the spools. I used a brass tube over the threads to better fit the spool holes and for smoother spool rotation. Tension adjustment is a piece of dense foam sandwiched between two stainless steel washers. I used nylon wing nuts because they don't turn and are easy to adjust. I opened the eye hooks a little so it is easier to change and maneuver thread. The thread stand is easily movable and tightened by wing nuts. The extra rod stand next to the thread stand was an added function. I wrap all my tips and it helps support the rod for wrapping the tip and the next guide.
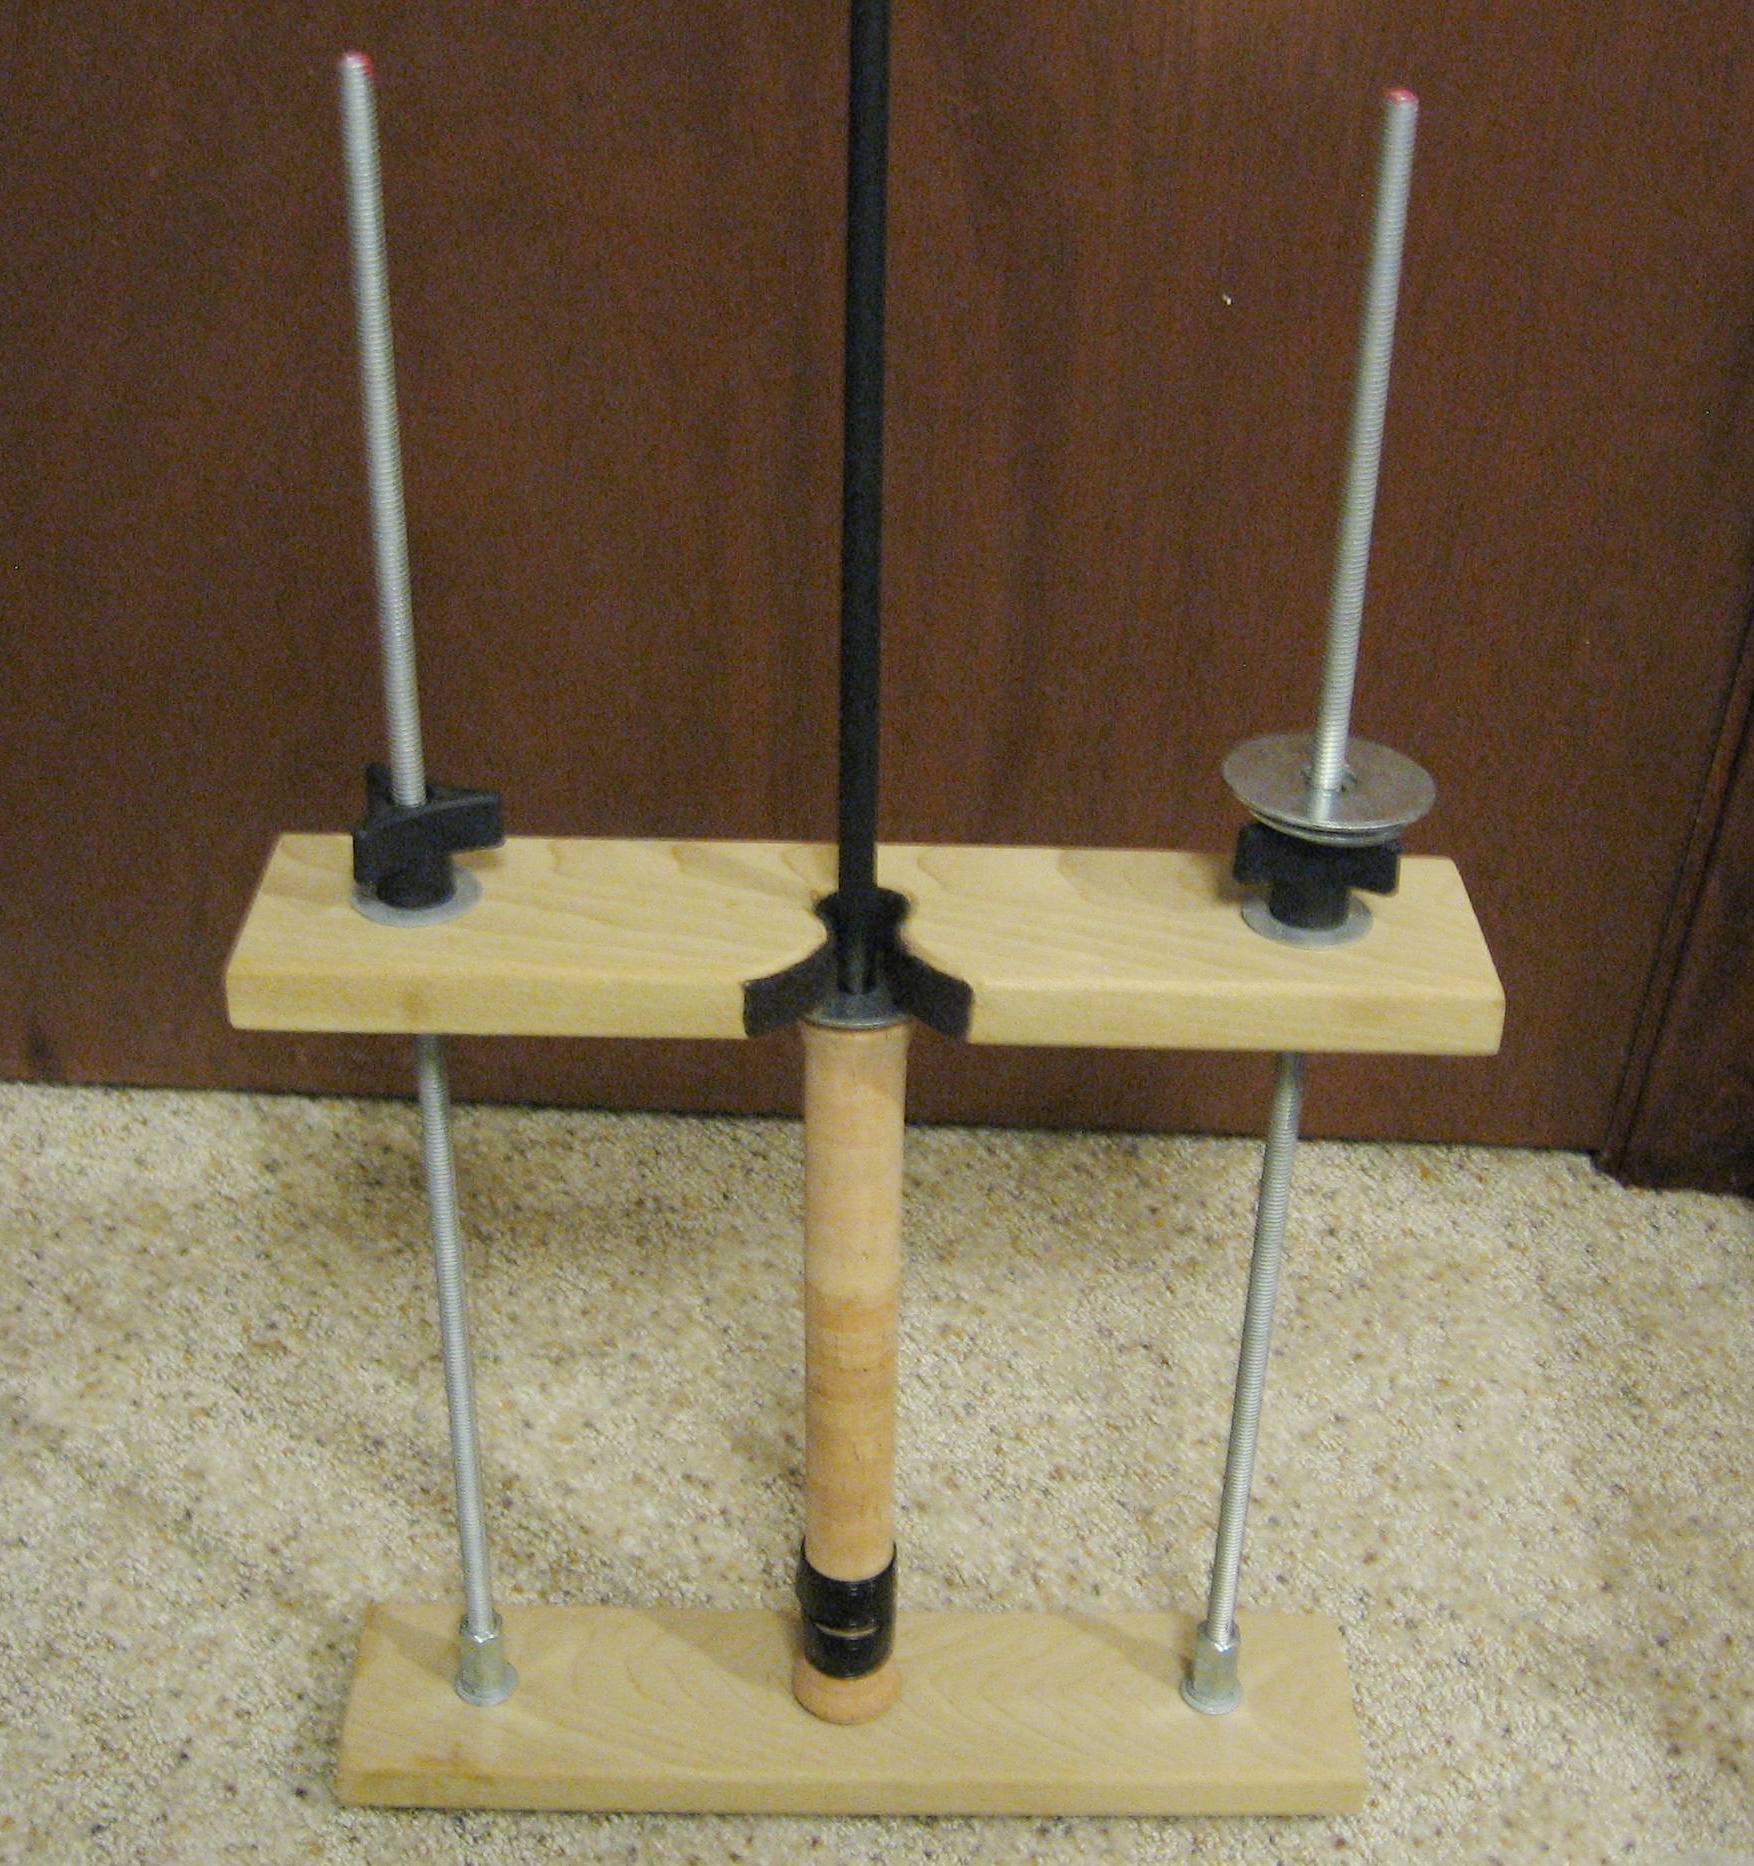
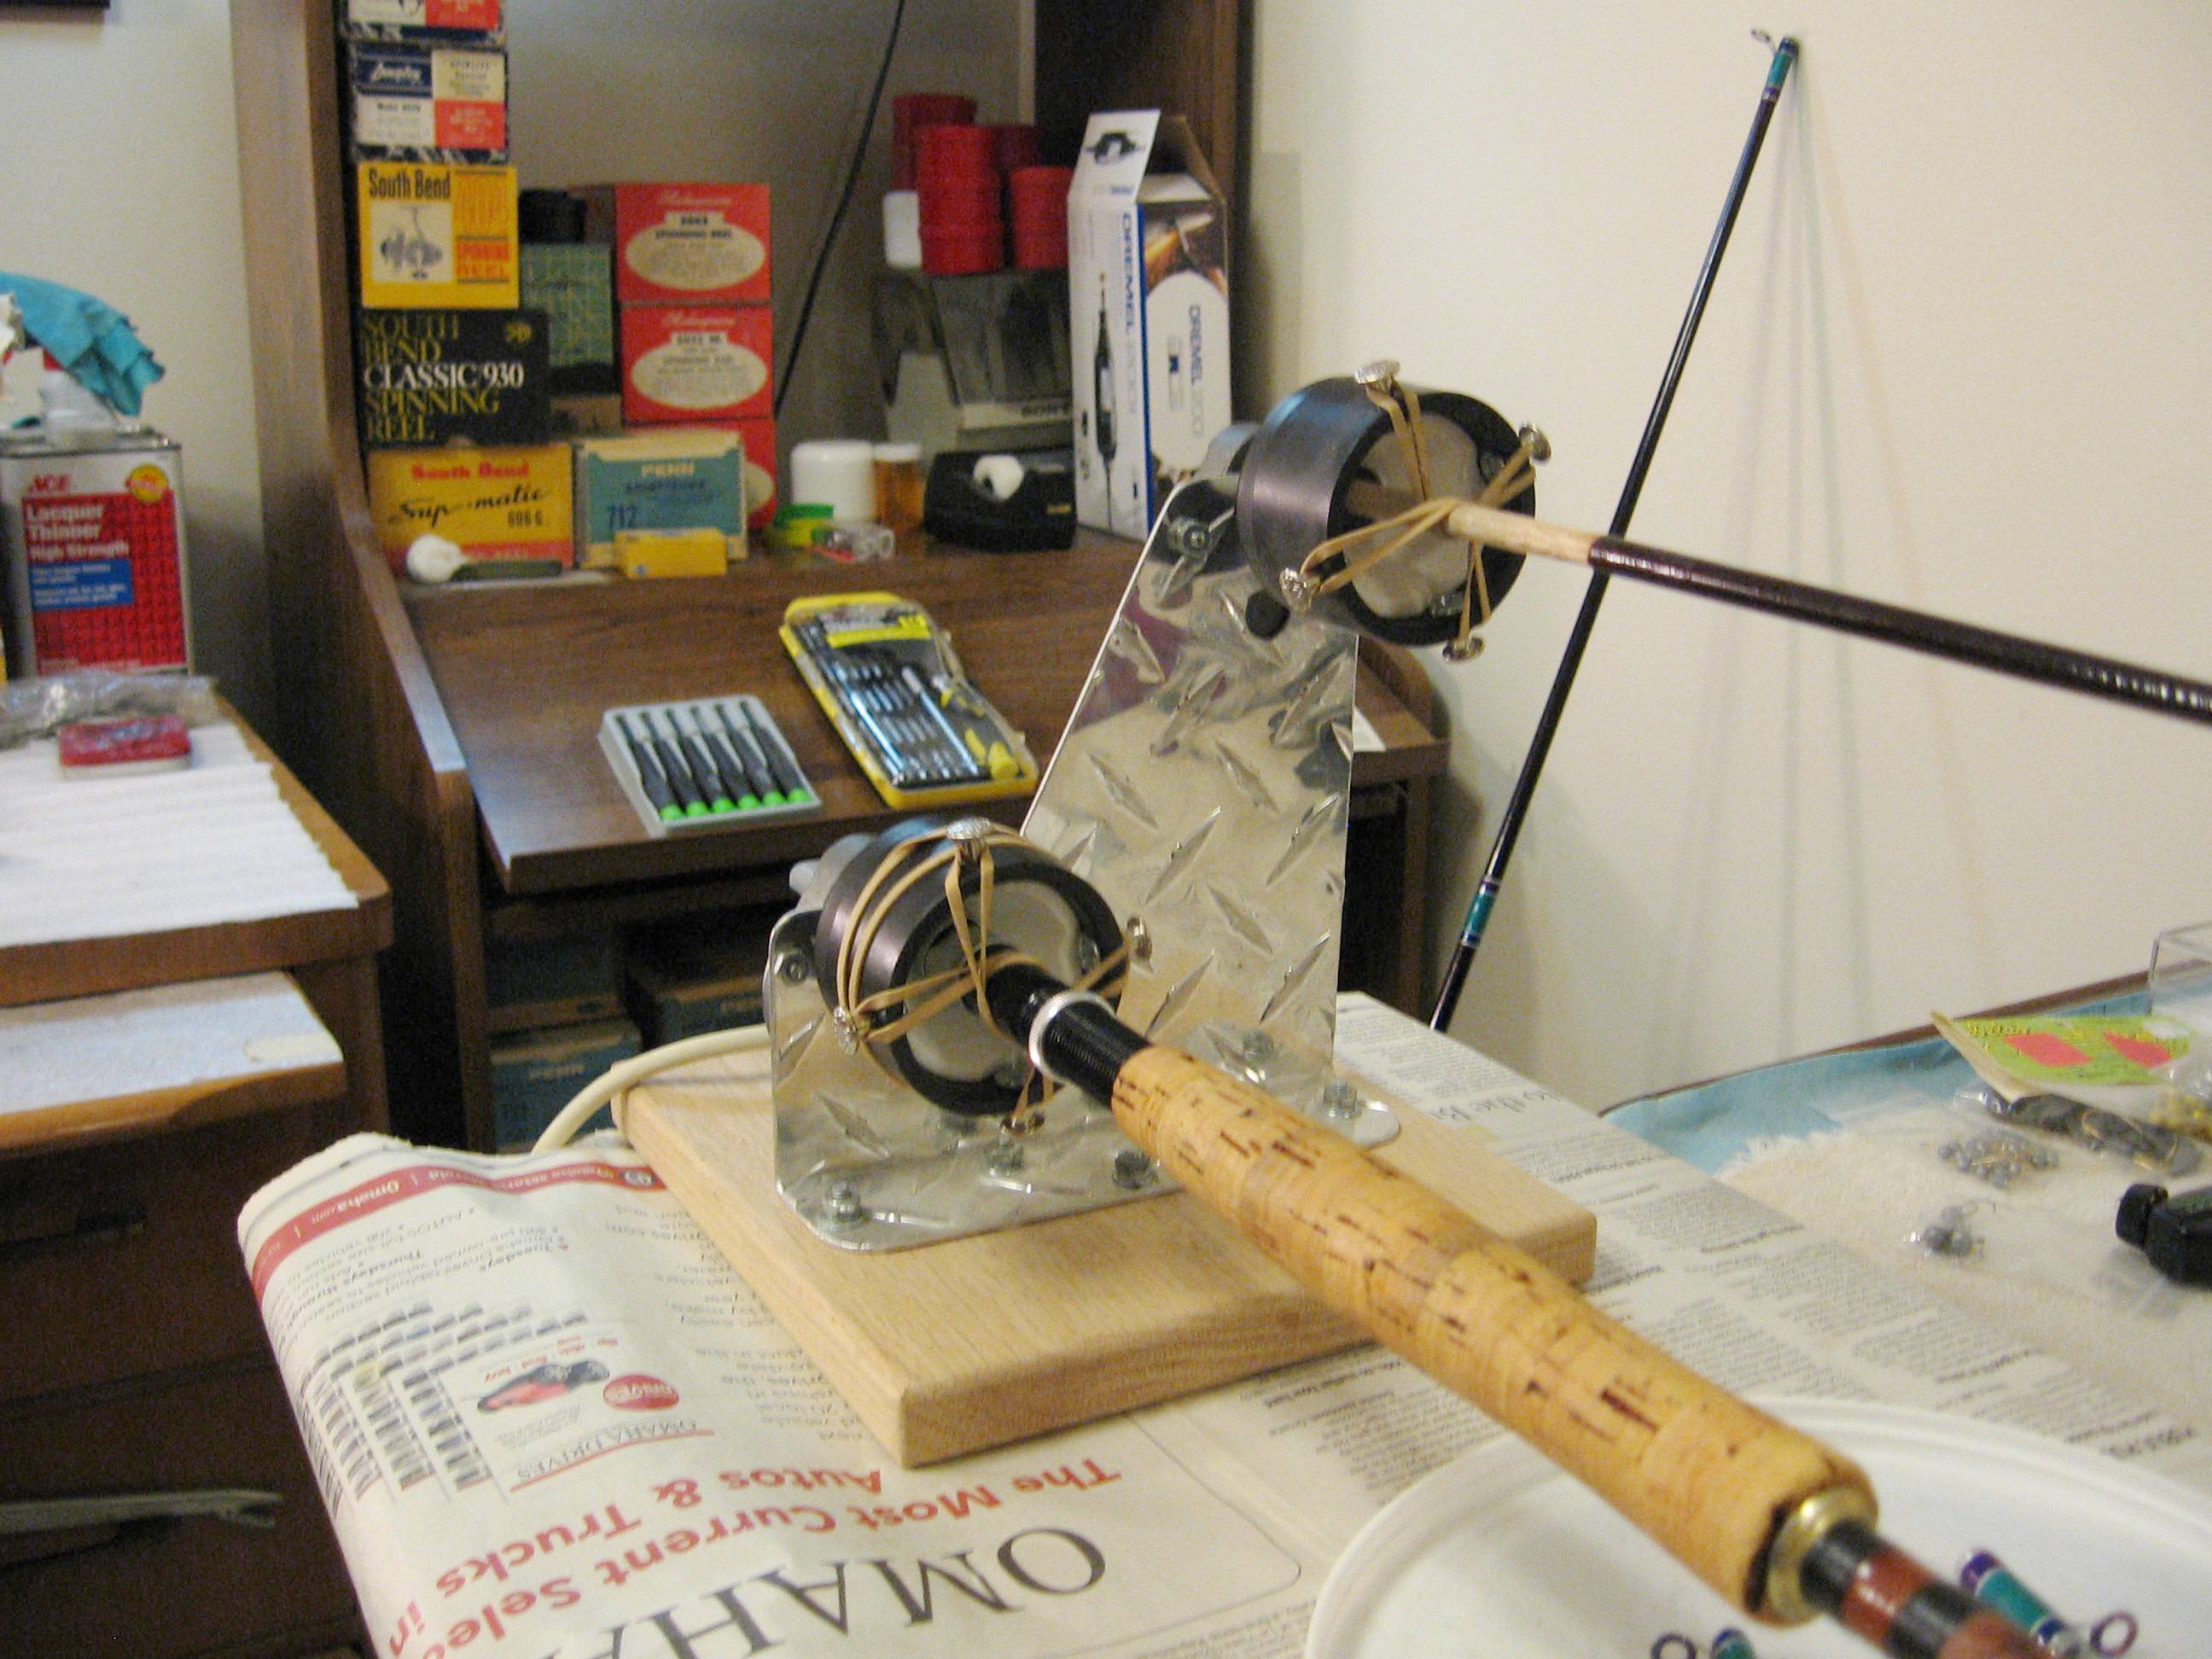
Here's my handle clamp, pretty basic. I made it out of poplar. It has couplings on the all-thread because I used a carriage bolt from the bottom side so it won't spin.

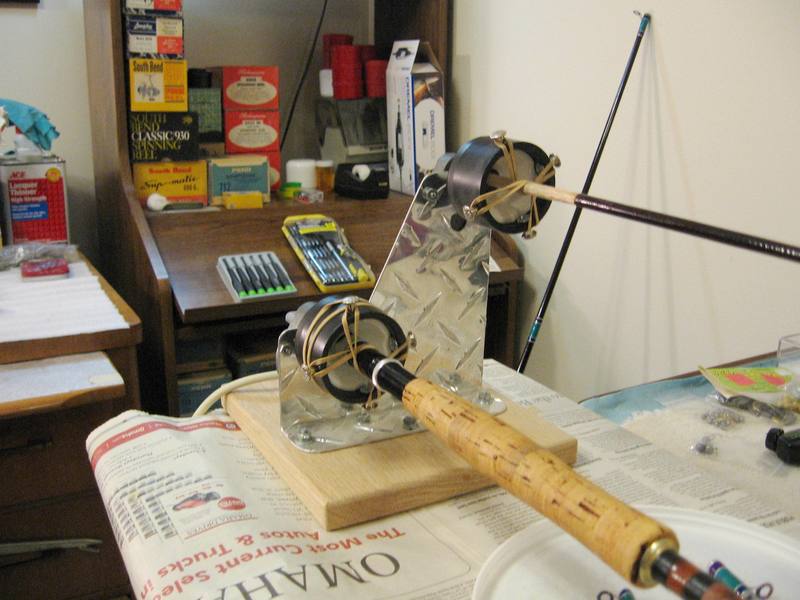
I started with one drying motor but later decided two would be much more efficient. I had a scrap of aluminum diamond plate so I made a bracket to attach the motors to. I offset/stair stepped the motors so that it would be easier to put finish on the rods. I start with the back/upper rod and then do the front/lower rod. The switches are lighted so I can easily tell whether they're on or not.

I used an ABS cap for the rod butt fitting because it's lighter than PVC. I did, though, insert a PVC cap inside the ABS cap. The ABS cap was too flat inside. The PVC cap is concave and works a lot better for automatically centering any size rod. I used a nylon bushing tube to attach the fitting to the motor shaft. There's a short lag from the back of the fitting into the nylon bushing and the bushing is held on the motor shaft with an allen set screw. I used Chicago screws and rubber bands to hold the rod in place. They actually pull the rod back into the fitting, are easy to use and work great. I've never yet found a need for a slip clutch.
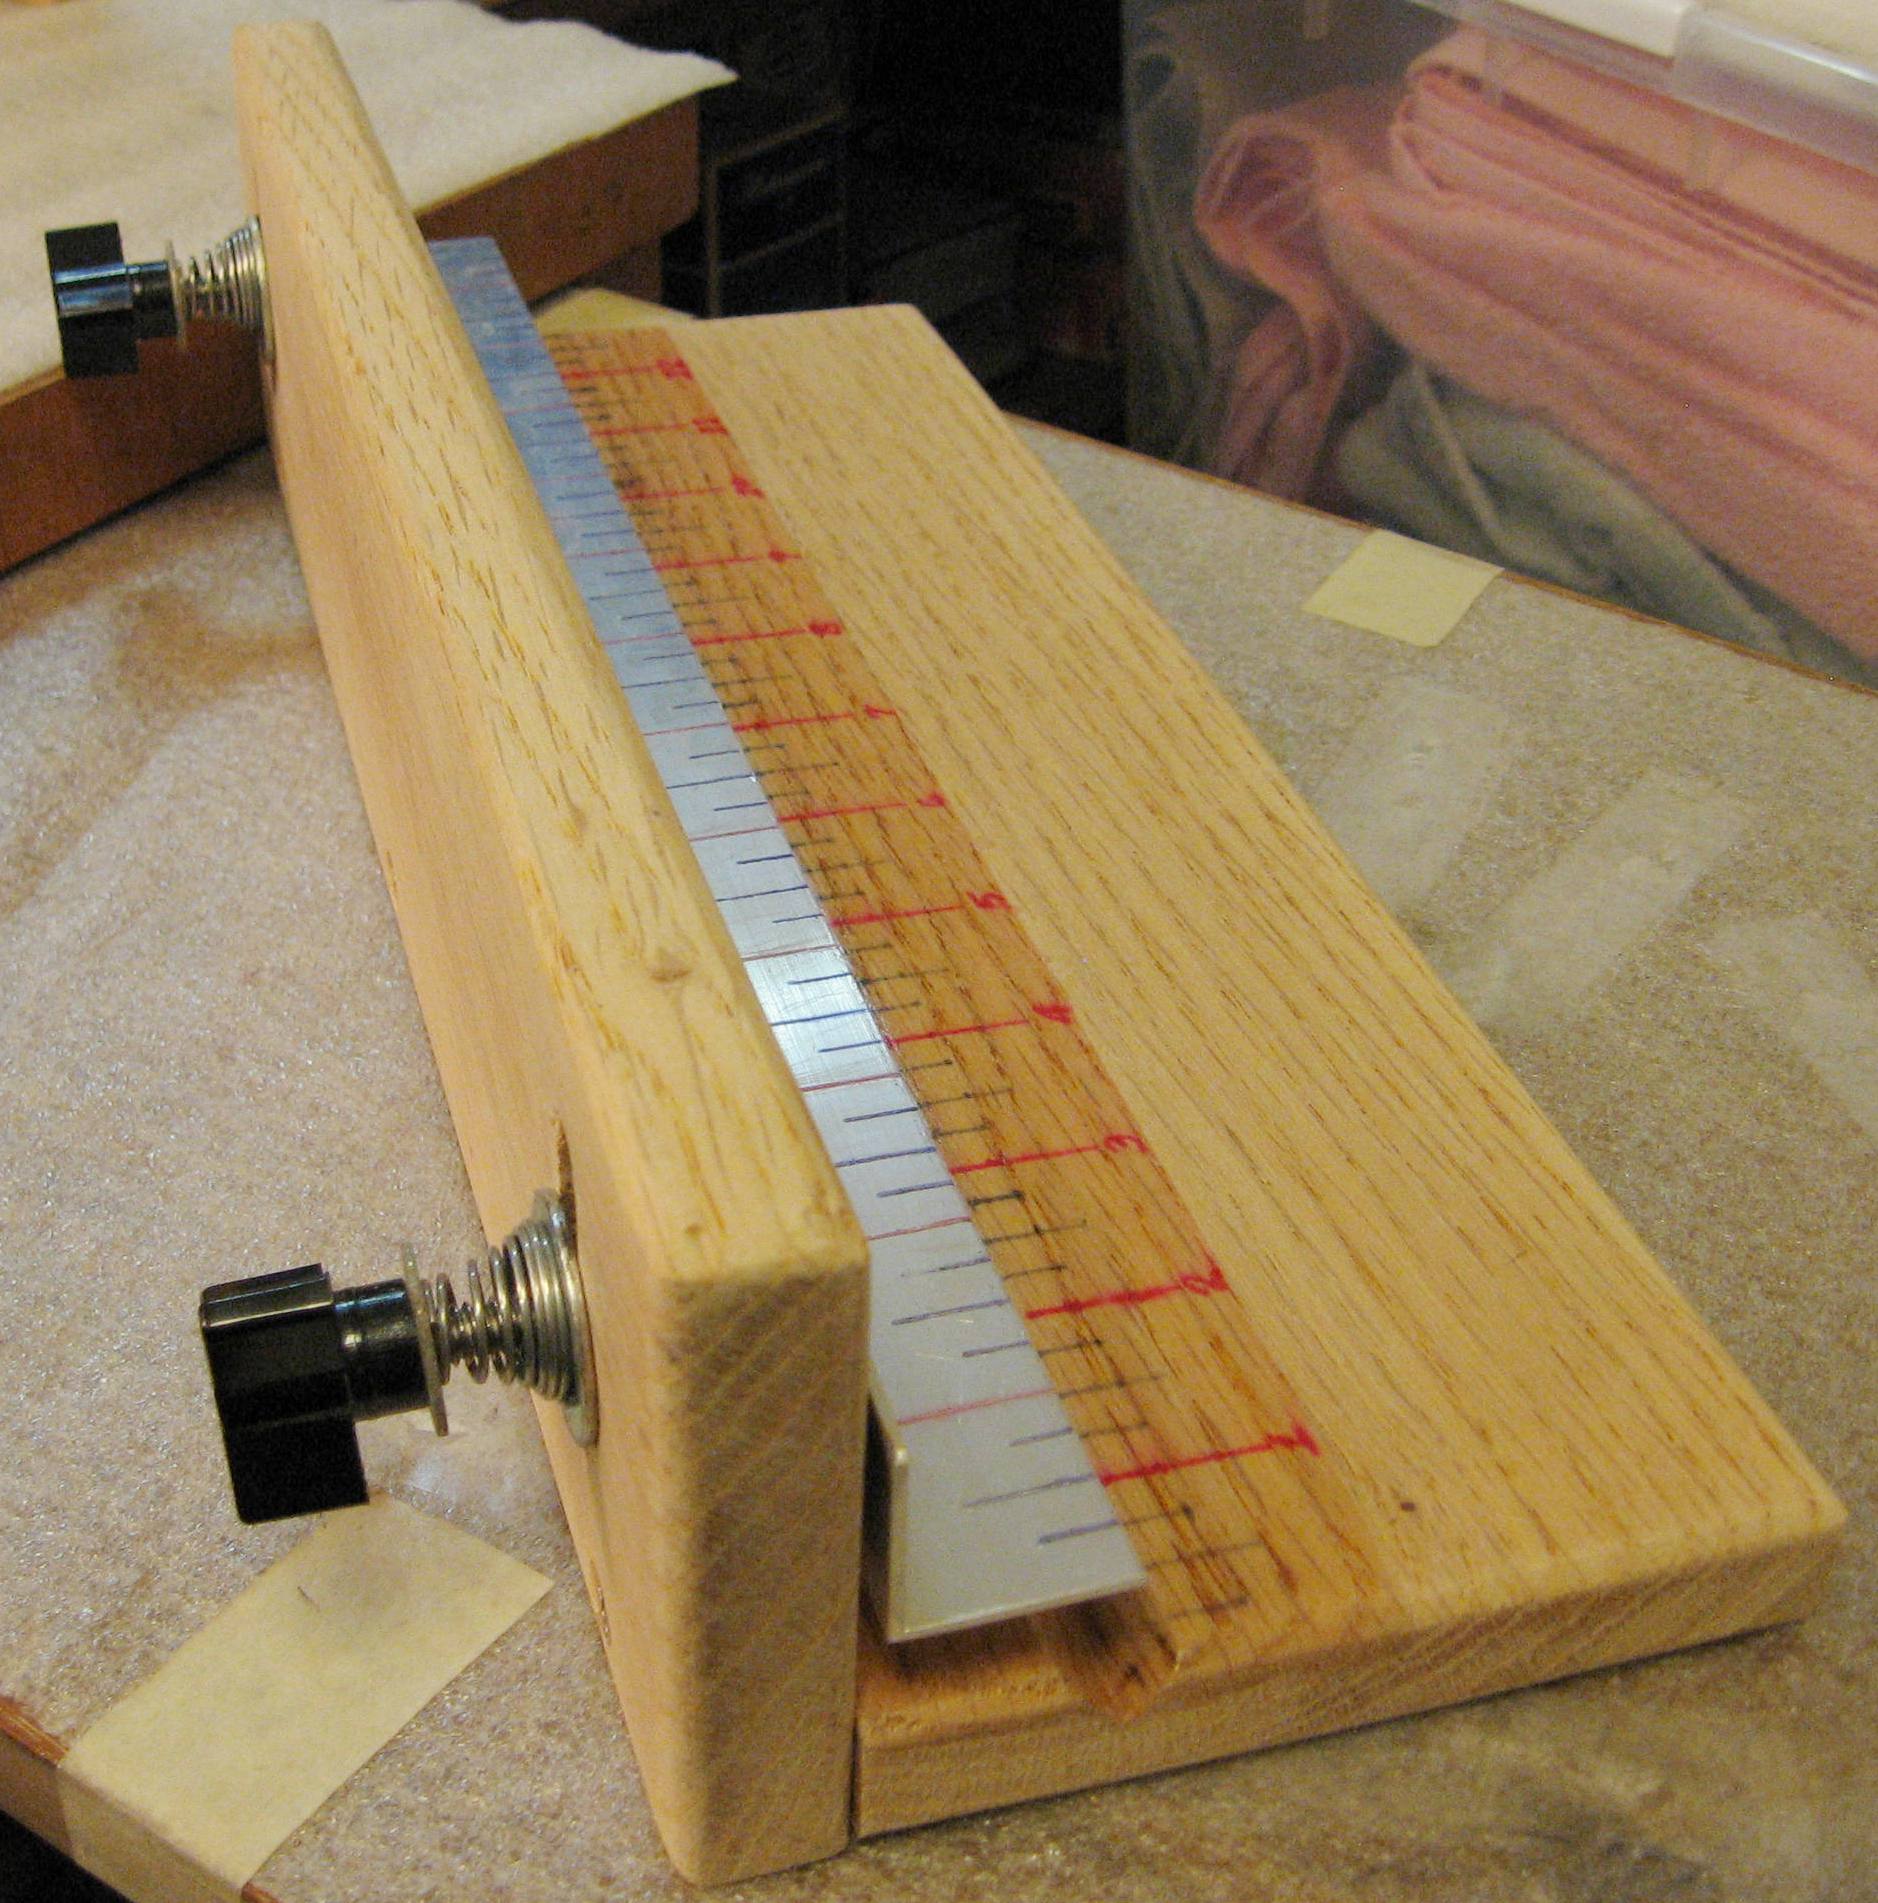
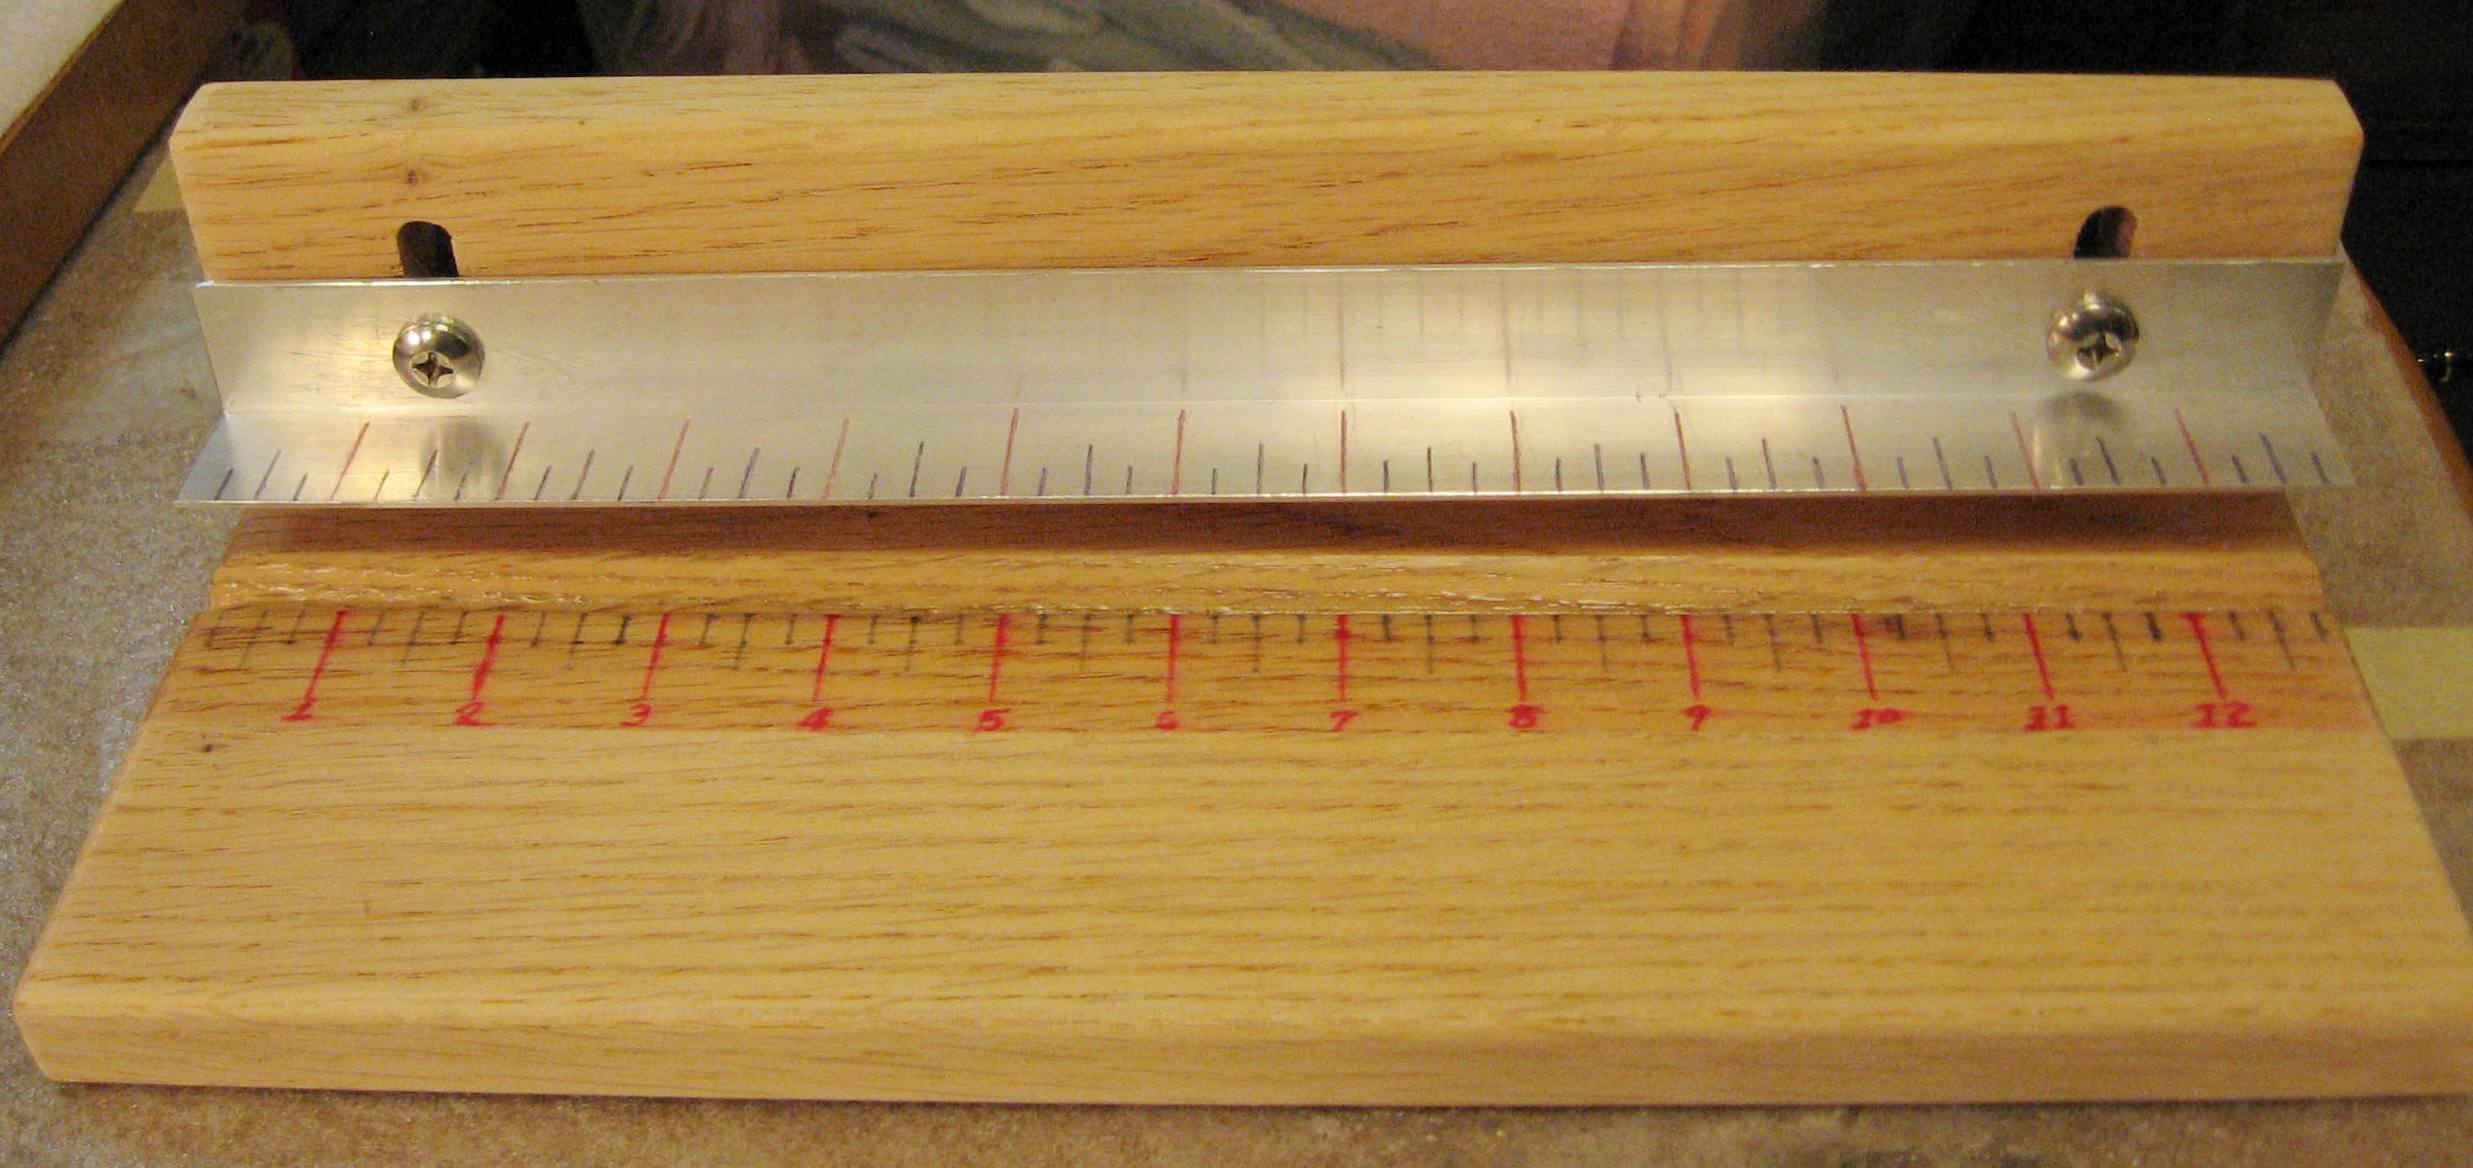
I decided this year I would break away from my standard wrapping designs and do a couple of decorative butt wraps. I didn't feel like spending $40 with shipping and wait a week for a butt wrap alignment tool so I took 3 hours one afternoon and made one from scratch. I had some 3/4" solid oak, bolts, washers & a piece of 1" aluminum angle laying around out in the shed. I ran up town to Ace Hardware & picked up a couple of plastic knobs, nylon flanged bushings & cone compression springs so I only have about $7 & my time invested, and the older I get the less my time seems to be worth.

I used pics of the CRB tool as my guide. The oak was 13" long so that's how long I made the jig instead of 12". I laid out the ruler in 1/4" increments on the oak and I also scratched grooves into the aluminum angle at the same locations and spacing. I used a router & 90° V groove bit for the blank recess. The outer edge of the angle runs right down the center of the groove for easy center alignment & marking. I coated the ruler marks and rod groove with urethane to protect them and also eliminate dust. The ink wasn't quite dry so they smeared a little when I coated the urethane but it's really no big deal, it's just cosmetic. The bolts are 1/4"x20. I drilled 5/16" holes top & bottom for the raise & lower slots and cut & filed the area in between them. That's where the flanged bushings come into play. The flange is between the wood back and angle and the bolt goes through the bushing. Since it is a wood back the bushing slides up & down smoothly and easily. It turned out pretty well and is accurate enough for anything I plan to tackle. I planned on doing a couple of short decorative diamond wraps on a couple of builds. I didn't plan on going overboard and adding too much weight. My builds are spinning rods so I try to keep them as light as possible.


So, those are my self manufactured rod wrapping devices. I don't have a whole lot invested and they work great for what I do.
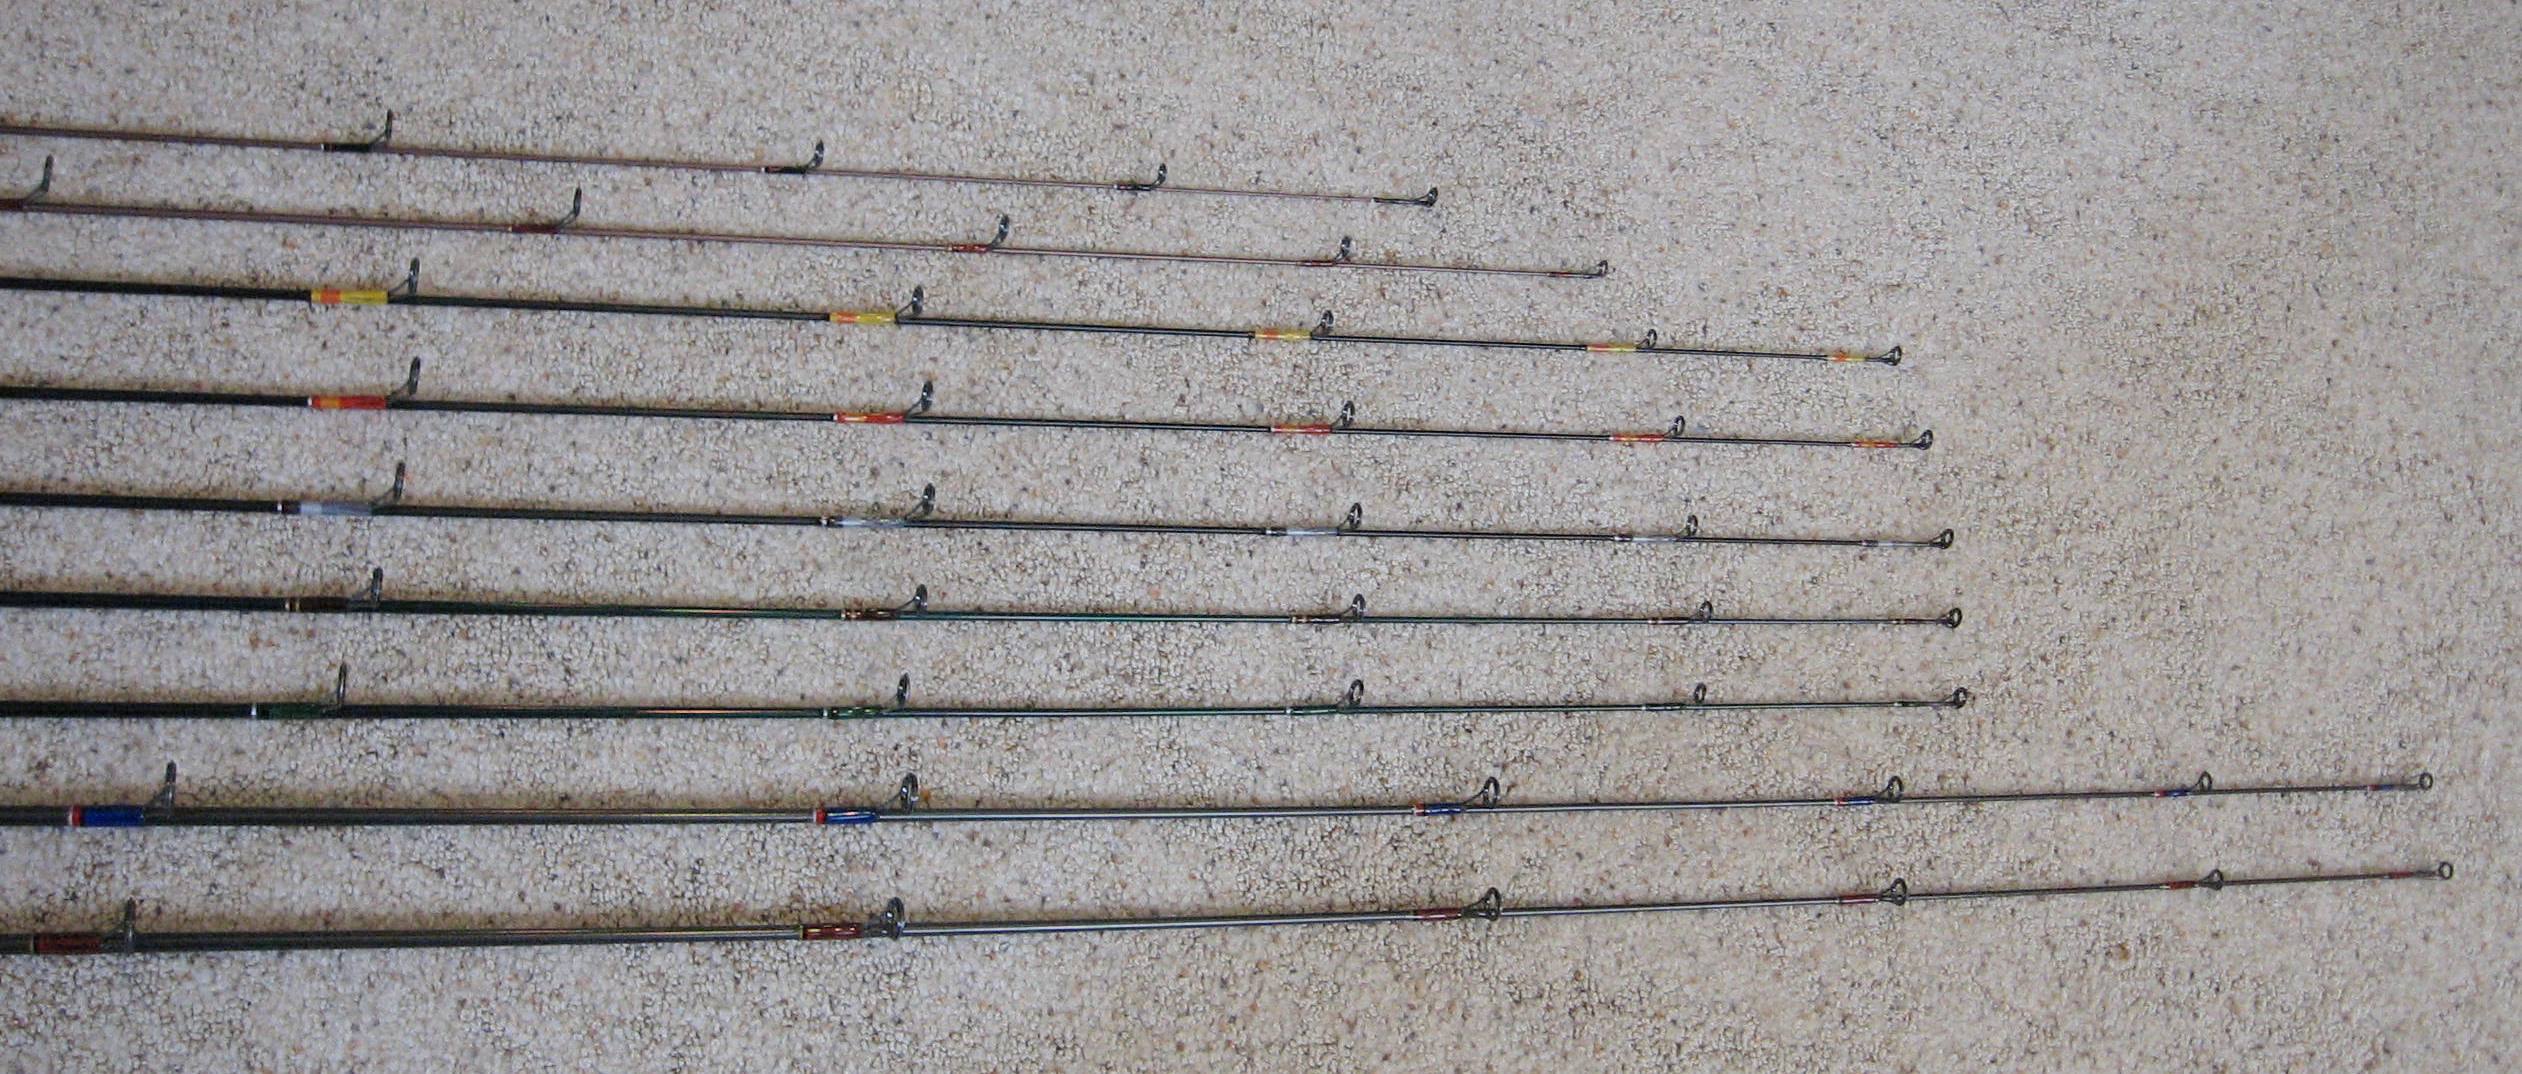
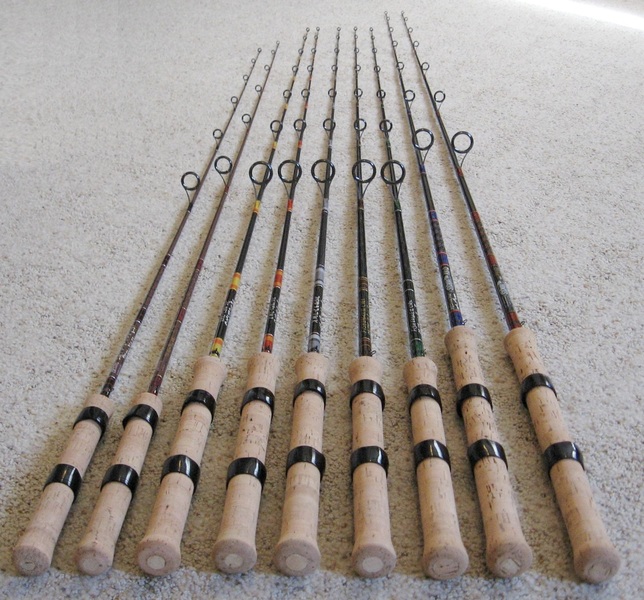
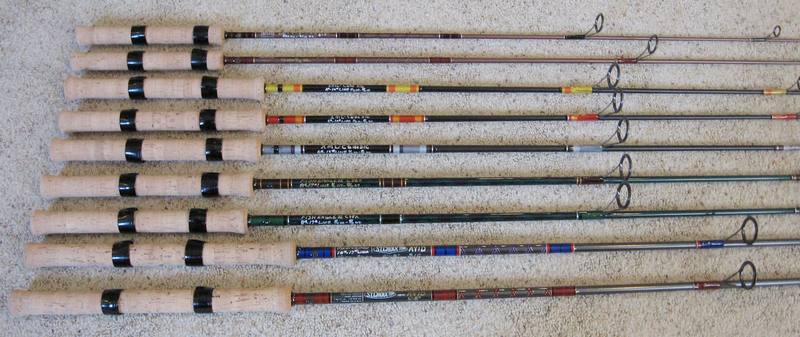
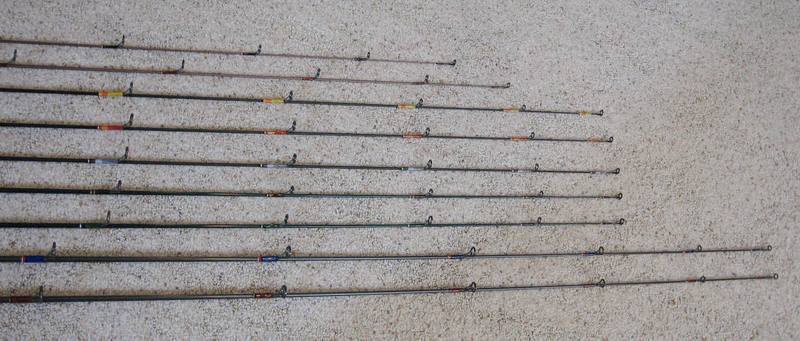
I decided back in early January that I would concentrate on building a bunch of rods this winter. I've had seven high end graphite spinning rod blanks just sitting in a tube in the corner for over 10 years, along with handles and Fuji SIC guide sets, waiting for me to get my butt in gear and build them out. I decided it was about time to get them done. I also wanted a couple more ultra lights since I already had all the components so I bought a couple of PacBay Arctos UL blanks. I read a couple of reviews that said they were kind of ugly but I thought how ugly can a metalic brown blank be? Ha! They're pretty darn ugly! They came flat metalic brown. Once I built them out I gave the rod portion two coats of Penetrol and that gave them a nice satin finish that looks pretty good. I ended up building nine rods and got them done just in time for spring fishing.
Here's the specs:
5'-3" Arctos 2-6# UL/Fast
5'-6" Arctos 4-8# UL/Fast
6'-0" XML 4-10# Light/Fast
6'-0" XML 4-10# Light/Fast
6'-0" XML 6-12# Medium Light/Fast
6'-0" Fish Eagle II 8-17# Medium/Fast
6'-0" Fish Eagle II 8-17# Medium/Fast
6'-8" St Croix Avid 10-17# Medium/Fast
6'-8" St Croix Avid 10-17# Medium/Fast
I'm currently giving the cork grips two coats of Penetrol for a good seal and protectant.
Here are some photos:
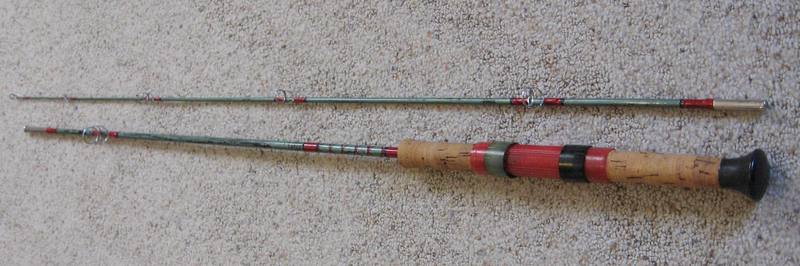
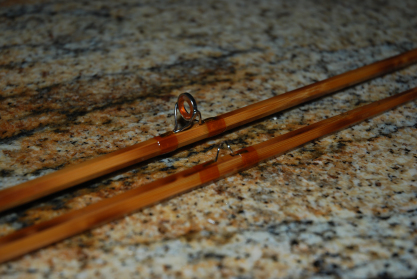
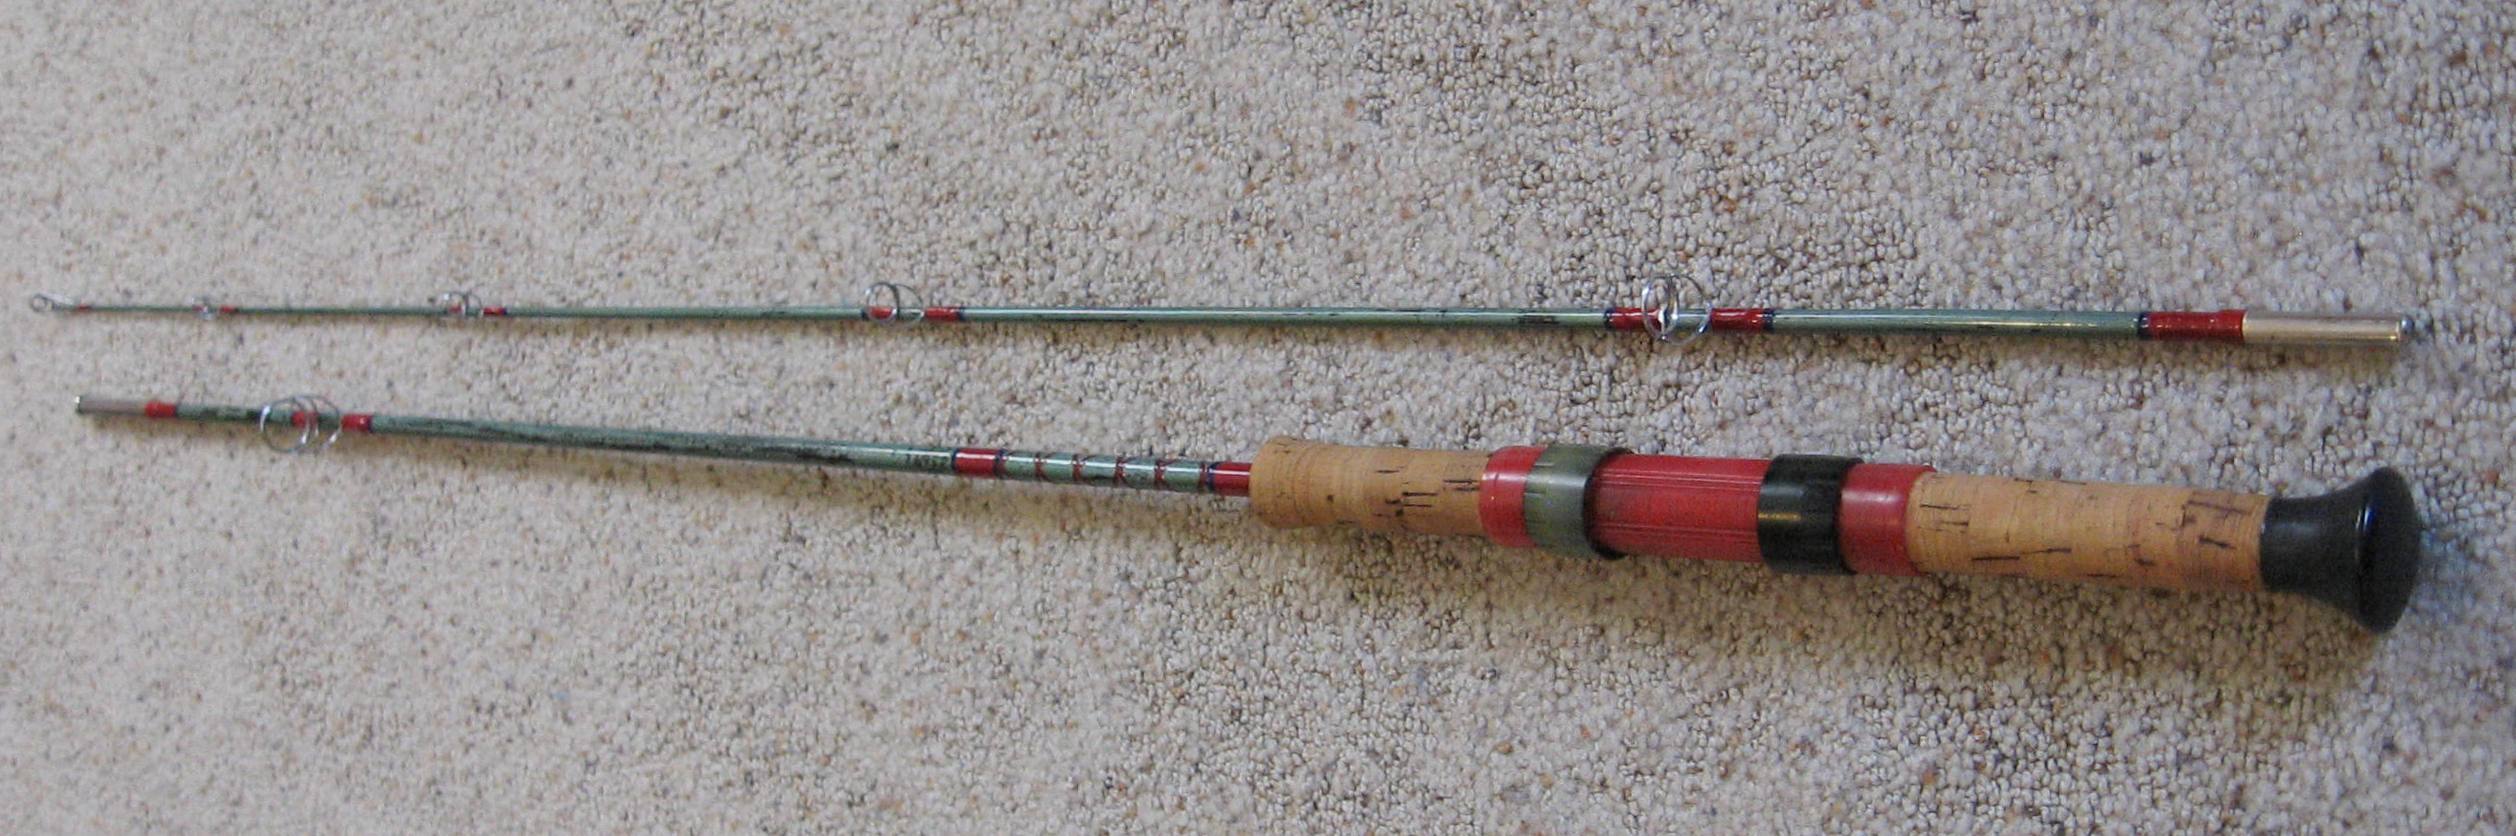
While I had my wrapping stuff out I decided to rewrap this old 2 piece South Bend Fast Lock. I even added a diamond butt wrap that wasn't originally there. The painted fiberglass blank is pretty worn so I just gave it a fine sanding and added a few coats of rod varnish over the old original wear. It was my first spinning rod and was coupled with a Garcia Mitchell 304 back in the day. It saw a lot of use in the late '60s & early '70s and had been repaired and seen a lot of nail polish many times over the years.

Here's before and after photos: