The Van Buren Reel

Use this forum to share your stuff so round up your favorite reels! Questions can still go to the Reel Talk - General Forum
Post Reply
User avatar
EclecticGuy
Advanced Board Poster
Posts: 115
Joined: Wed Jan 28, 2009 7:50 am
Location: Groton, MA
Contact:

The Van Buren Reel

Post by EclecticGuy »

As I mentioned last year, a few of us were part of a team to create a fishing exhibit for the Martin Van Buren National Historic Site. Dr. Todd spearheaded the effort. My "job" was to reproduce a mid 19th century reel and a horse hair fishing line. The line was easy, see my article Horse Hair Fly Line for details.

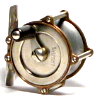
The reel took a bit of research, noodling, and experimentation. Since Van Buren lived in Kinderhook, NY and traveled between there and Washington DC while he was President, it made sense that he might visit the New York City tackle shops of the era. A New York reel seemed fitting both for the era and the location. I was fortunate to be able to borrow 2 reels to scrutinize and even disassemble and had detailed photos from 3 other period reels. The reel I finally choose to duplicate is this one:
Image

Image

The reel is a multiplier and has a stop latch (to lock the spool from rotating). It is about 2" in diameter and has an original, unmolested long reel foot.

I had to learn a few new techniques to fabricate this reel. I started with the front plate and cover. This was turned from a 2" diameter section of brass.

Image

The central "cone" was turned. It appeared that this was how the original was made. The decorative grooves were done by hand with a narrow tipped graver.

Image

The plate has a small lip to accommodate the cover. Next up is the reel foot and bracket assembly. The foot was formed from .064" brass that was pounded in to shape in a concave wooden mold. The bracket is just a bar of brass with a concave cradle for the foot.

Image

The bracket is riveted to the foot with two 1/8" brass pins.

The back plate was fabricated similar to the front plate. Here are the front and back plate assembled to the reel foot bracket.

Image

The screws were made from drill rod. The originals appeared to be #3 and maybe 50TPI. I only had 4-40 taps and dies so I used those. But I took care to make the screw heads the proper shape and size. Here is a bottom view of the assembly with the front cover in place.

Image

Here are the pillars in place. They are 1/8" D brass rods. The back side is turned down to 1/16" to fit holes in the back plate and peened in place. The front end is also reduced in size (3/32") for mating holes in the front plate.

Image

The spool was a complex bit to fabricate. The spool ends were formed using lathe spinning. This is how the originals were made. It was an easy technique to master. The spindle is my design since I could not take the reference reel apart to see how it was put together. But, it made sense.

Image

The spool plates will be silver soldered to it in the next step. Here is the completed spool assembly.

Image

The 8 tooth pinion attaches to the 1/8" shaft on the right side. Here is the frame and spool dry assembled.

Image

With this work complete, it was time to turn to the mechanicals - the stop latch and multiplier mechanisms. The stop latch consists of a small lever and a brass spring fitted with a steel pin. The lever lifts the spring and pin out of a hole that passes through the plate and spool. The ball head on the lever was tricky. The original lever end is egg shaped and appeared to be shaped by hand, not turned on a lathe. I used files to fabricate mine. The end opposite the handle has a 45 degree bevel to act as a wedge to lift the spring. You can see it in this photograph.

Image

The handle is attached to the main gear (20 tooth). The gear pivots on an idler post fabricated from steel. I attached this from the back with an oval head 2-56 screw. I don't know how the original was done but this made sense.

Image

The main gear was re-shafted and turned. The end was cut to a square with a file to mate with the handle crank.

Image

The handle assembly was straight forward. The crank shape was copied from the original. The brass is thicker at the hub end than the handle end. I tapered it with files. The hub end has a square hole to receive the main gear shaft. The grip is "vegetable ivory" - Tagua Nut. I started the fatiguing process of it.

Image

Here's a top view of the mechanical assembly.

Image

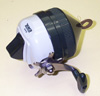
The last thing to do was peen the pillar ends to form a nice rivet head. Once this is done, the reel can not be disassembled. Here are some photos of the new reel next to the original reel.

Image

Image

Image

Image

And here is the reel attached to the reproduction Porter's General rod made by John Elder.

Image

Image

Image

Cheers,
Michael
User avatar
Dick Braun,that-zebco-guy
Super Board Poster
Posts: 689
Joined: Sat Oct 25, 2008 6:36 am
Location: Punta Gorda, Fl

Truely Amazing!!!!!

Post by Dick Braun,that-zebco-guy »

Step by step and super pictures.
David M
Advanced Board Poster
Posts: 445
Joined: Fri Nov 06, 2009 7:28 pm
Location: Branson, Missouri

Post by David M »

That's truly a piece of first class brass right there. I realize it's for an important exhibit, but wouldn't it be a blast to very carefully take that set-up to your local perch pond, and catch at least one fish...just for grins. After all that hard work, seems it would almost be a shame not to try it out, and have a little fun. We would want pictures though of course. David
User avatar
john elder
Star Board Poster
Posts: 8669
Joined: Mon Sep 22, 2003 2:44 pm

Post by john elder »

That is just superb, Michael...and for those that want to see all the trials and tribulations of the project, including the reel, rod, creel, flies, and lures that were generated by the project:

http://thevanburenboys.wordpress.com/

if you scroll to that bottom of that page and click on "past entries", then scroll to the bottom of that page, you can suffer along from the beginning
:D
Richard Lodge
Super Board Poster
Posts: 1253
Joined: Tue Sep 16, 2003 10:00 pm
Location: Massachusetts

Amazing work!

Post by Richard Lodge »

I'm happy to say I had the good fortune of being able to hold, photograph and get up close and personal with Michael's amazing reproduction of a mid-19th century brass reel. He lives about a mile from me and was kind enough to loan the reel and John's fantastic (and looooooong) wooden rod for a day so I could take some photos for the next Reel News. These guys are craftsman in the finest tradition, each studying and measuring, then applying their skills to their creations. John's rod features brass bands, reel seat and tunnel guides he made by hand. The butt cap unscrews for storage of the tip section. And Michael's brass reel is just the coolest darned thing! It's a virtual clone of Todd's original, antique multiplier (I've held both of these reels, side by side). Excellent craftsmanship all around! And these guys do a wonderful job sharing descriptions and photos of their work as it progresses, which I find both entertaining and very educational. If only I had such talent!
User avatar
EclecticGuy
Advanced Board Poster
Posts: 115
Joined: Wed Jan 28, 2009 7:50 am
Location: Groton, MA
Contact:

Post by EclecticGuy »

Thanks Richard! I look forward to seeing the photos in the Reel News! I had bad separation anxiety on Saturday after I mailed the reel to its new home at the Martin Van Buren National Historic Site, so I went to my shop and started to make another for myself!

cheers,
Michael
User avatar
reelsmith.
Ultra Board Poster
Posts: 1737
Joined: Sun Sep 14, 2003 11:08 am
Location: Connecticut
Contact:

Post by reelsmith. »

Very cool, Michael.

Thanks for showing us that. I am jealous of your skills.

Dean.
User avatar
EclecticGuy
Advanced Board Poster
Posts: 115
Joined: Wed Jan 28, 2009 7:50 am
Location: Groton, MA
Contact:

Post by EclecticGuy »

Thanks Dean. Once I figured out a few techniques like lathe spinning, it was surprisingly to that difficult to make.

cheers,
Michael
Don Champion
Ultra Board Poster
Posts: 1637
Joined: Thu Oct 09, 2003 2:22 pm
Location: Salisbury, NC

Post by Don Champion »

Michael, Instead of hammering that foot from a piece of bar stock have you considered making it in a tubular shape from round bar stock and splitting it length ways with a saw to make 3 or 4 reel seats? Then you could make 3 or 4 reels.
User avatar
EclecticGuy
Advanced Board Poster
Posts: 115
Joined: Wed Jan 28, 2009 7:50 am
Location: Groton, MA
Contact:

Post by EclecticGuy »

You've been reading my book haven't you Don? That is exactly the method I use for fabricating reel feet in The Reelsmith's Primer. However, on this reel I was not only trying to make a reproduction in appearance but also use as many of the same fabrication techniques. So, for instance, I lathe spun the spool plates just like the originals. The foot was likely shaped by forming in a mold the way I did according to the tooling marks. I made my own screws too. The only thing I know for sure that the original had but I did not fabricate the same way was the foot bracket and crank arms were both cast. I used brass flatstock but I did taper by hot forging to mimic the original.

cheers,
Michael
Don Champion
Ultra Board Poster
Posts: 1637
Joined: Thu Oct 09, 2003 2:22 pm
Location: Salisbury, NC

Post by Don Champion »

Michael - No, I haven't read your book. After 40 years in a machine shop and with what few machine tools I have, it is how I would do it. Outside of a small lathe made in China all I have are hand tools. I bought the lathe new and reworked it before ever turning it on. Now it is amazingly accurate. After I do it, I'll have to show you how I cut gears on it! That's only a thought at the present time but I know it'll work.
Post Reply